¶ Events
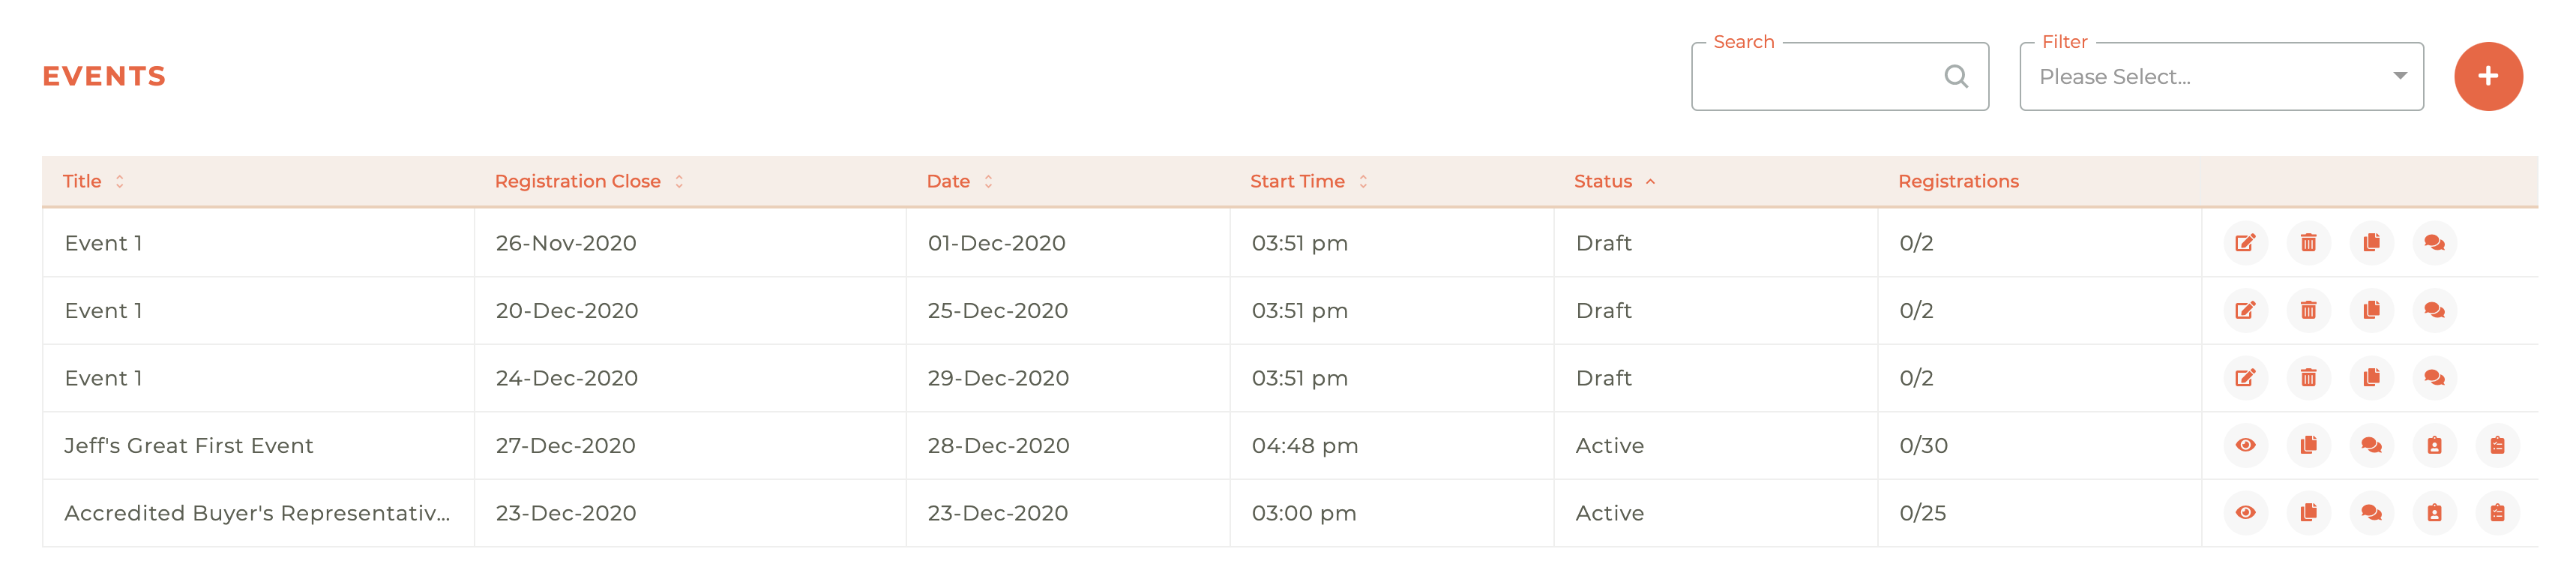
¶ Seach & Filter
You may search on name and you may filter on Draft, Active, Closed and Cancelled status.

¶ Creating A New Event
When you click on the Plus - - icon in the upper right hand corner, the Create Event panel will slide out from the right side of the dashboard. There are two steps to this process.
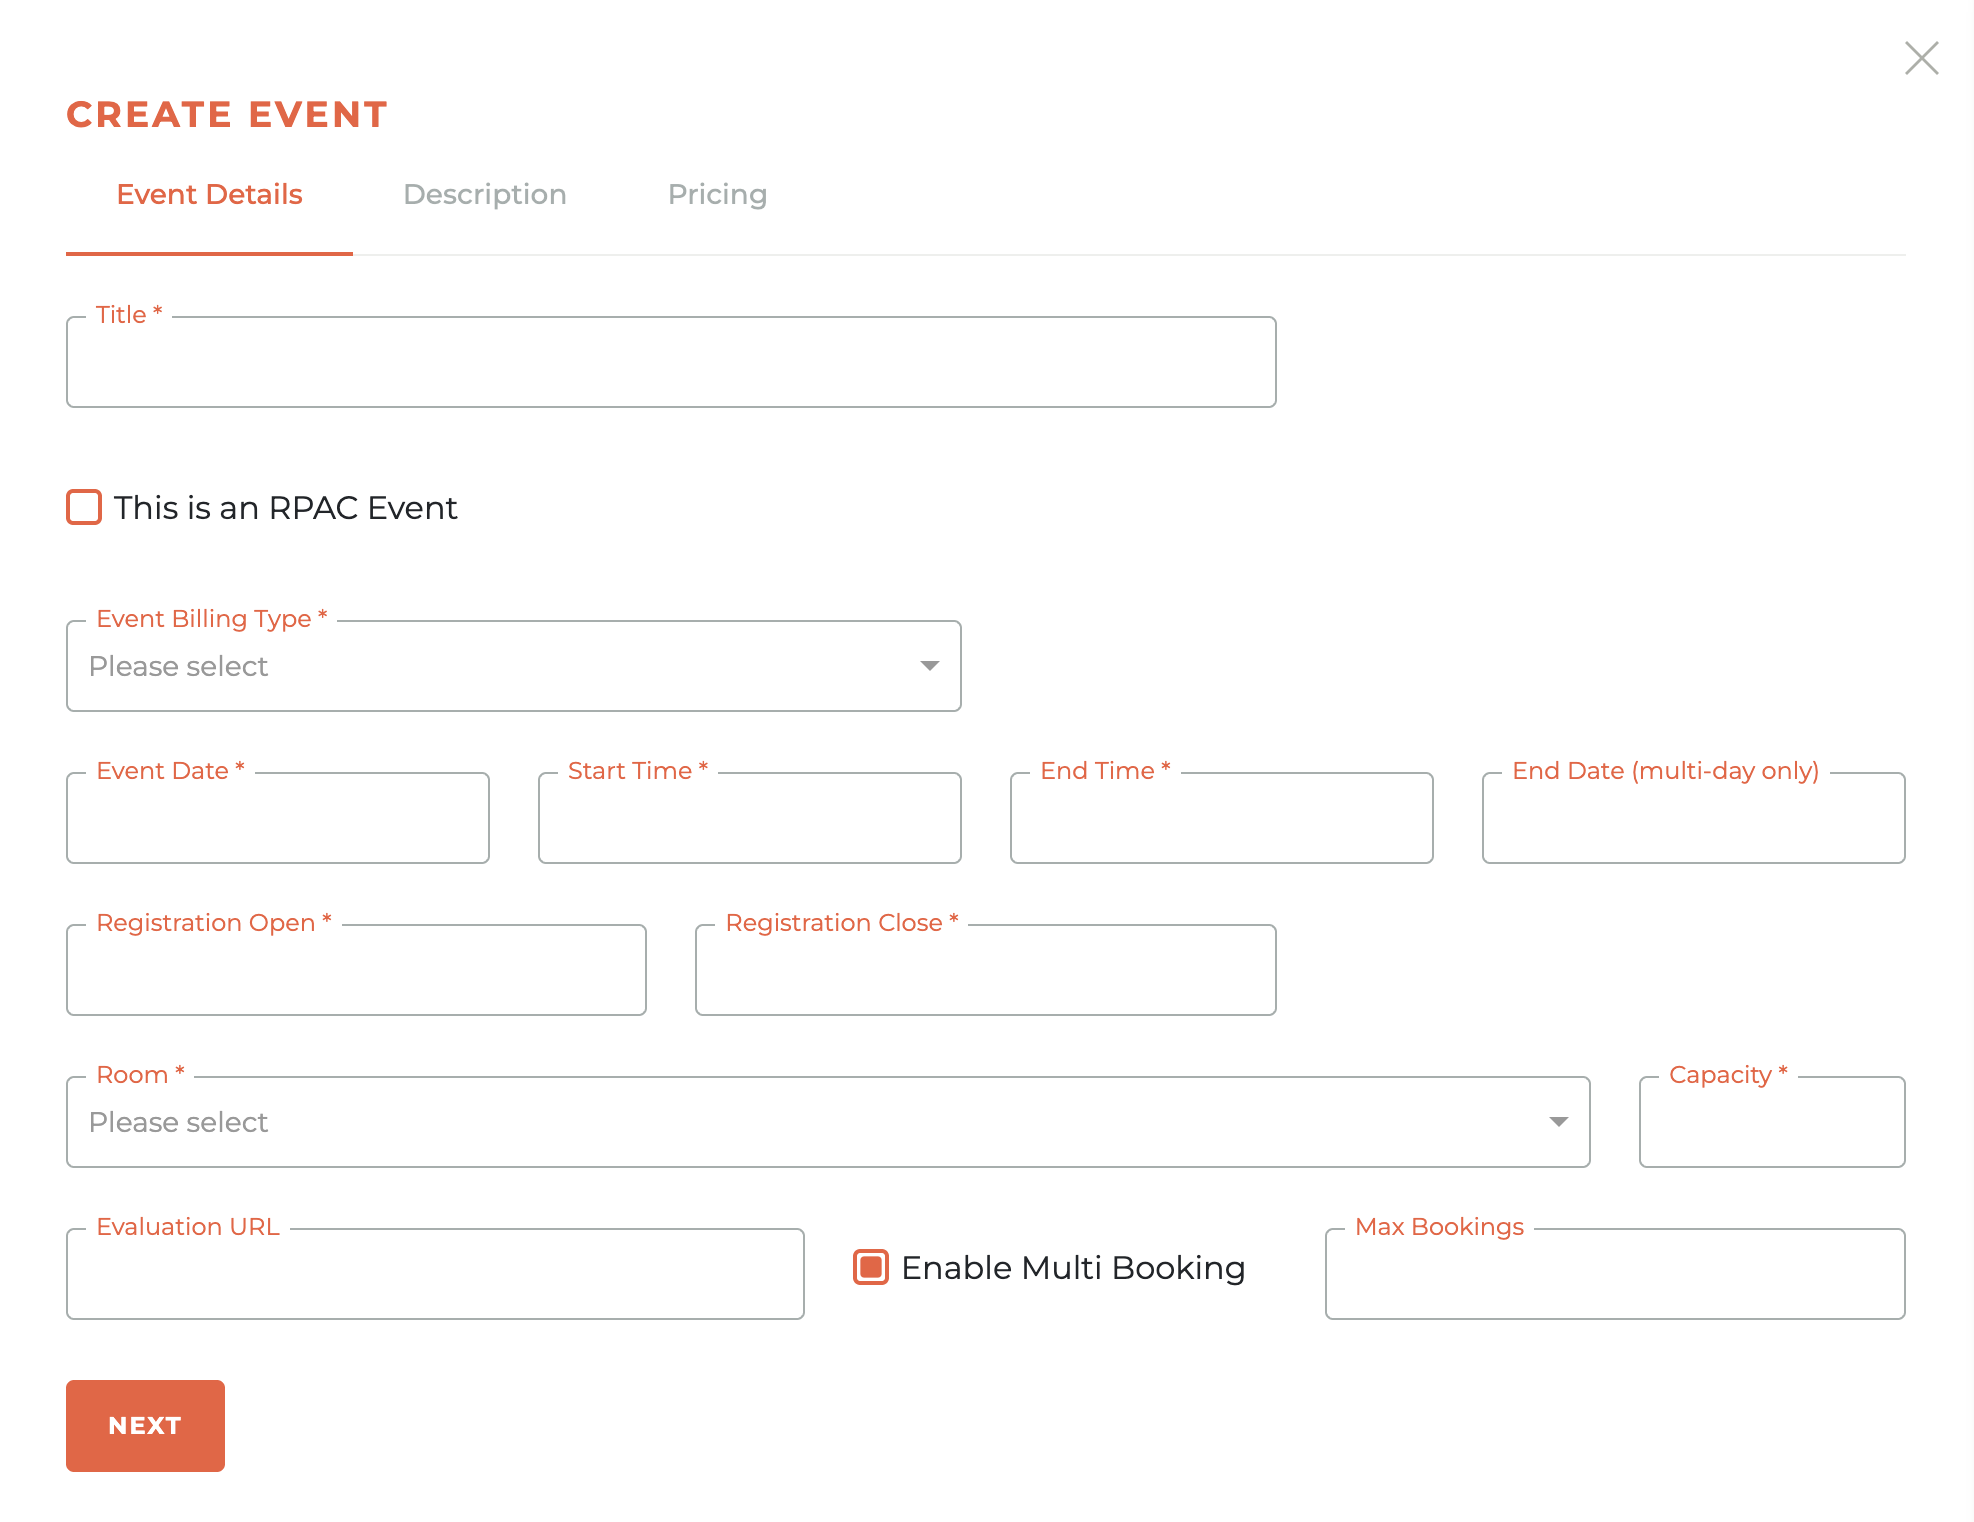
¶ Step 1: Event Details
In the Event Details tab of the “Create Event” window, enter the event name in Title, check This is an RPAC Event if the gathering supports RPAC, and select an Event Billing Type to link revenue rules. Set the Event Date, Start Time, and End Time, adding an End Date only when the program spans multiple days. Define the enrollment window with Registration Open and Registration Close, assign the Room, and limit attendance with Capacity. If you will collect feedback, paste the survey link into Evaluation URL (this is the URL that will be used if you choose to create a followup survey notification email). Enable Multi Booking when one member can reserve spots for others, and restrict that number in Max Bookings. When every field looks right, click Next to continue to the Description step.
¶ Enable Multi Booking
As part of Step 1, you may also choose to enable "Event Multi Booking." You do this by checking the radio button next to "Enable Multi Booking."
Choosing this option will allow a member/subscriber to purchase tickets for members and/or non-members, as set forth by the pricing. For a members only event, multiple tickets will only be allowed to be purchased for other members.

On the member side, an event that has multi booking available will present the option to add additional tickets.
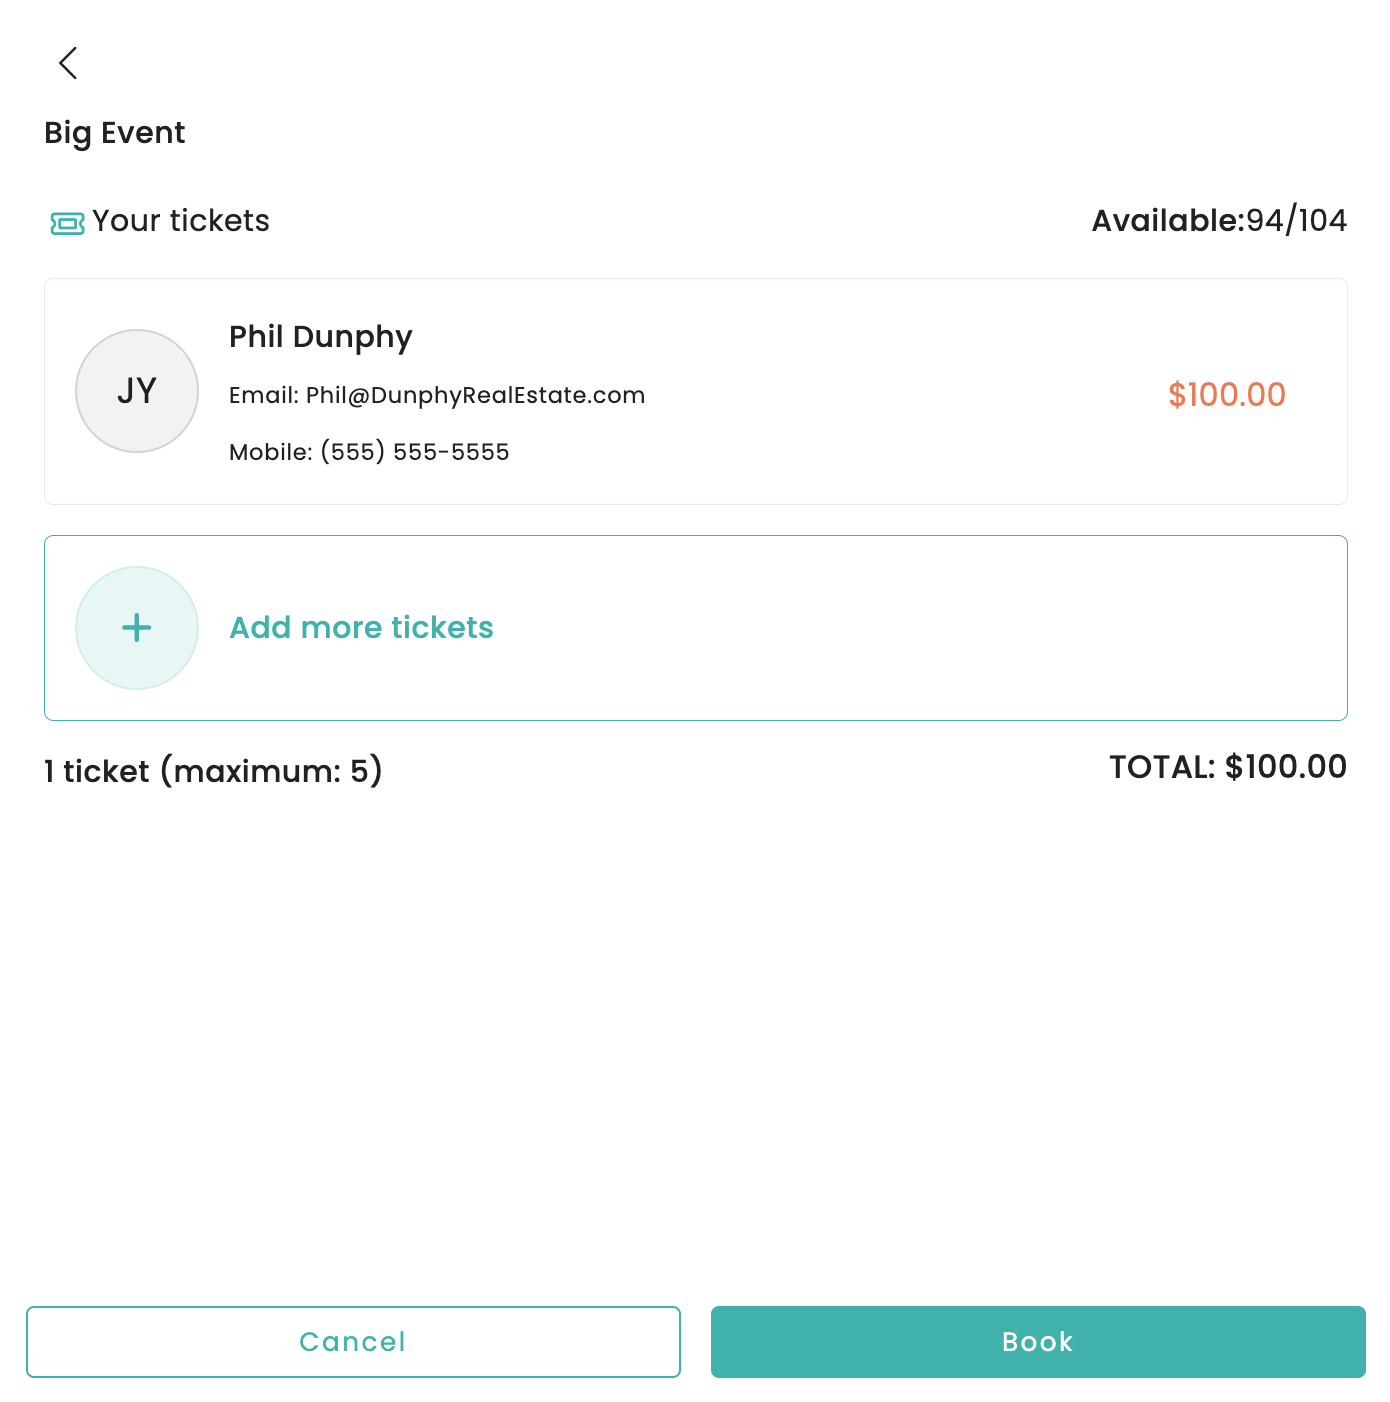
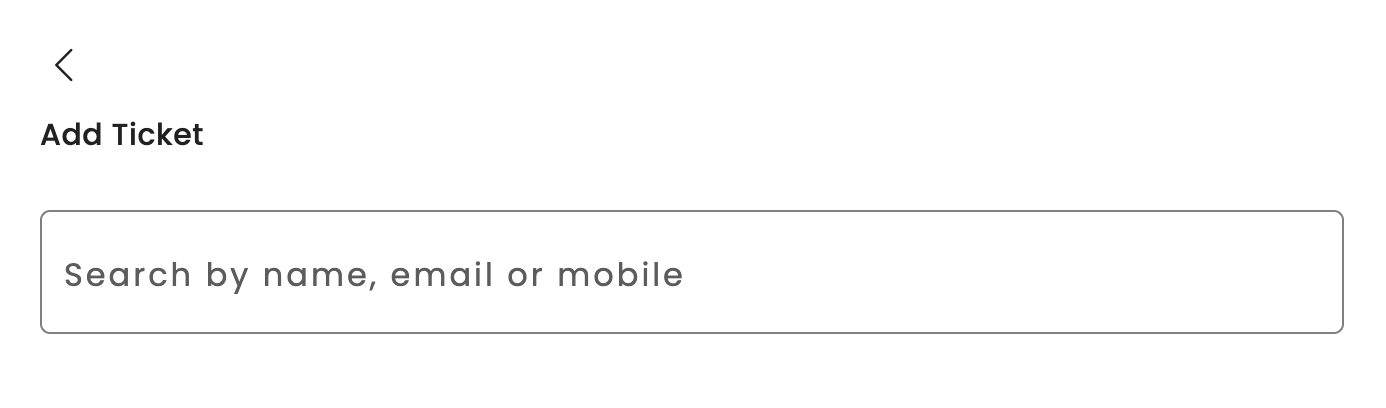
Members will be able to search for other members as part of this process, or, if it is open to non-members, add a booking for the non-member without searching.
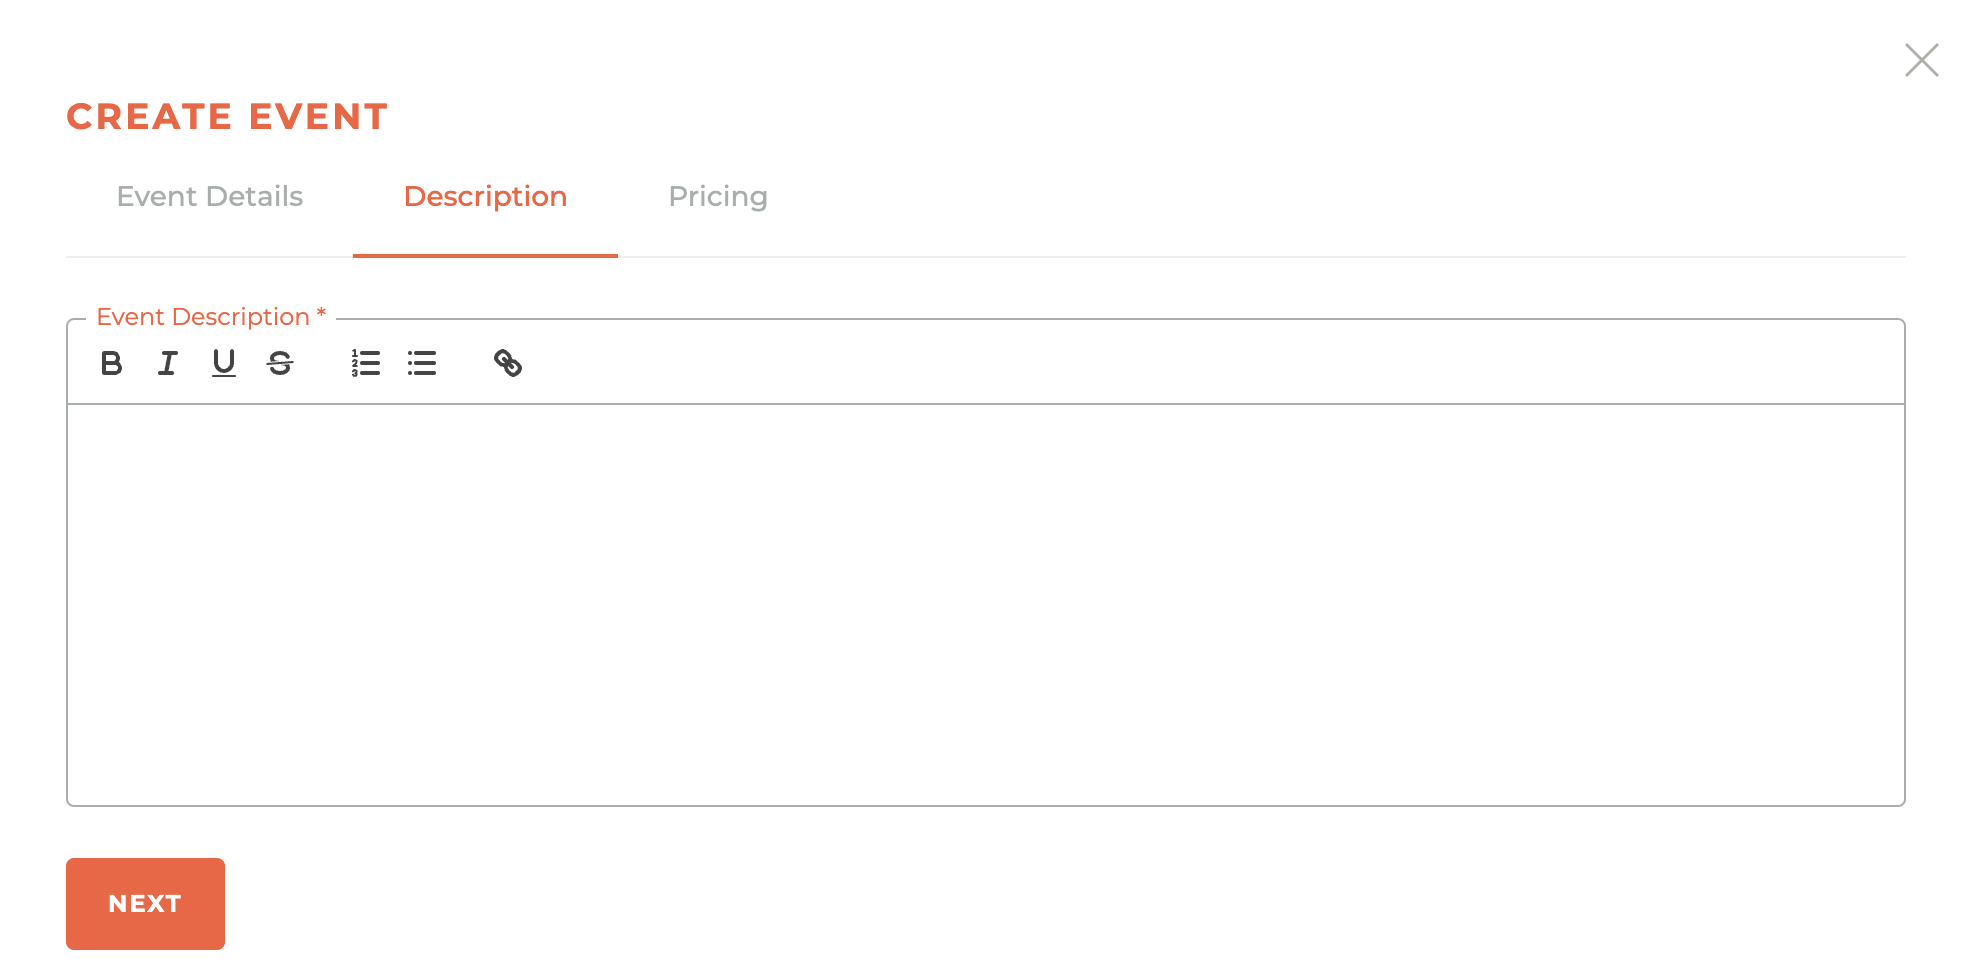
¶ Step 2: Description
You can provide an event description here and will be able to style this content. Just select the text you wish to bold, italicize, underline, strikethrough, bullet list or number list. You will not be able to save until you have completed the pricing section in step 3.
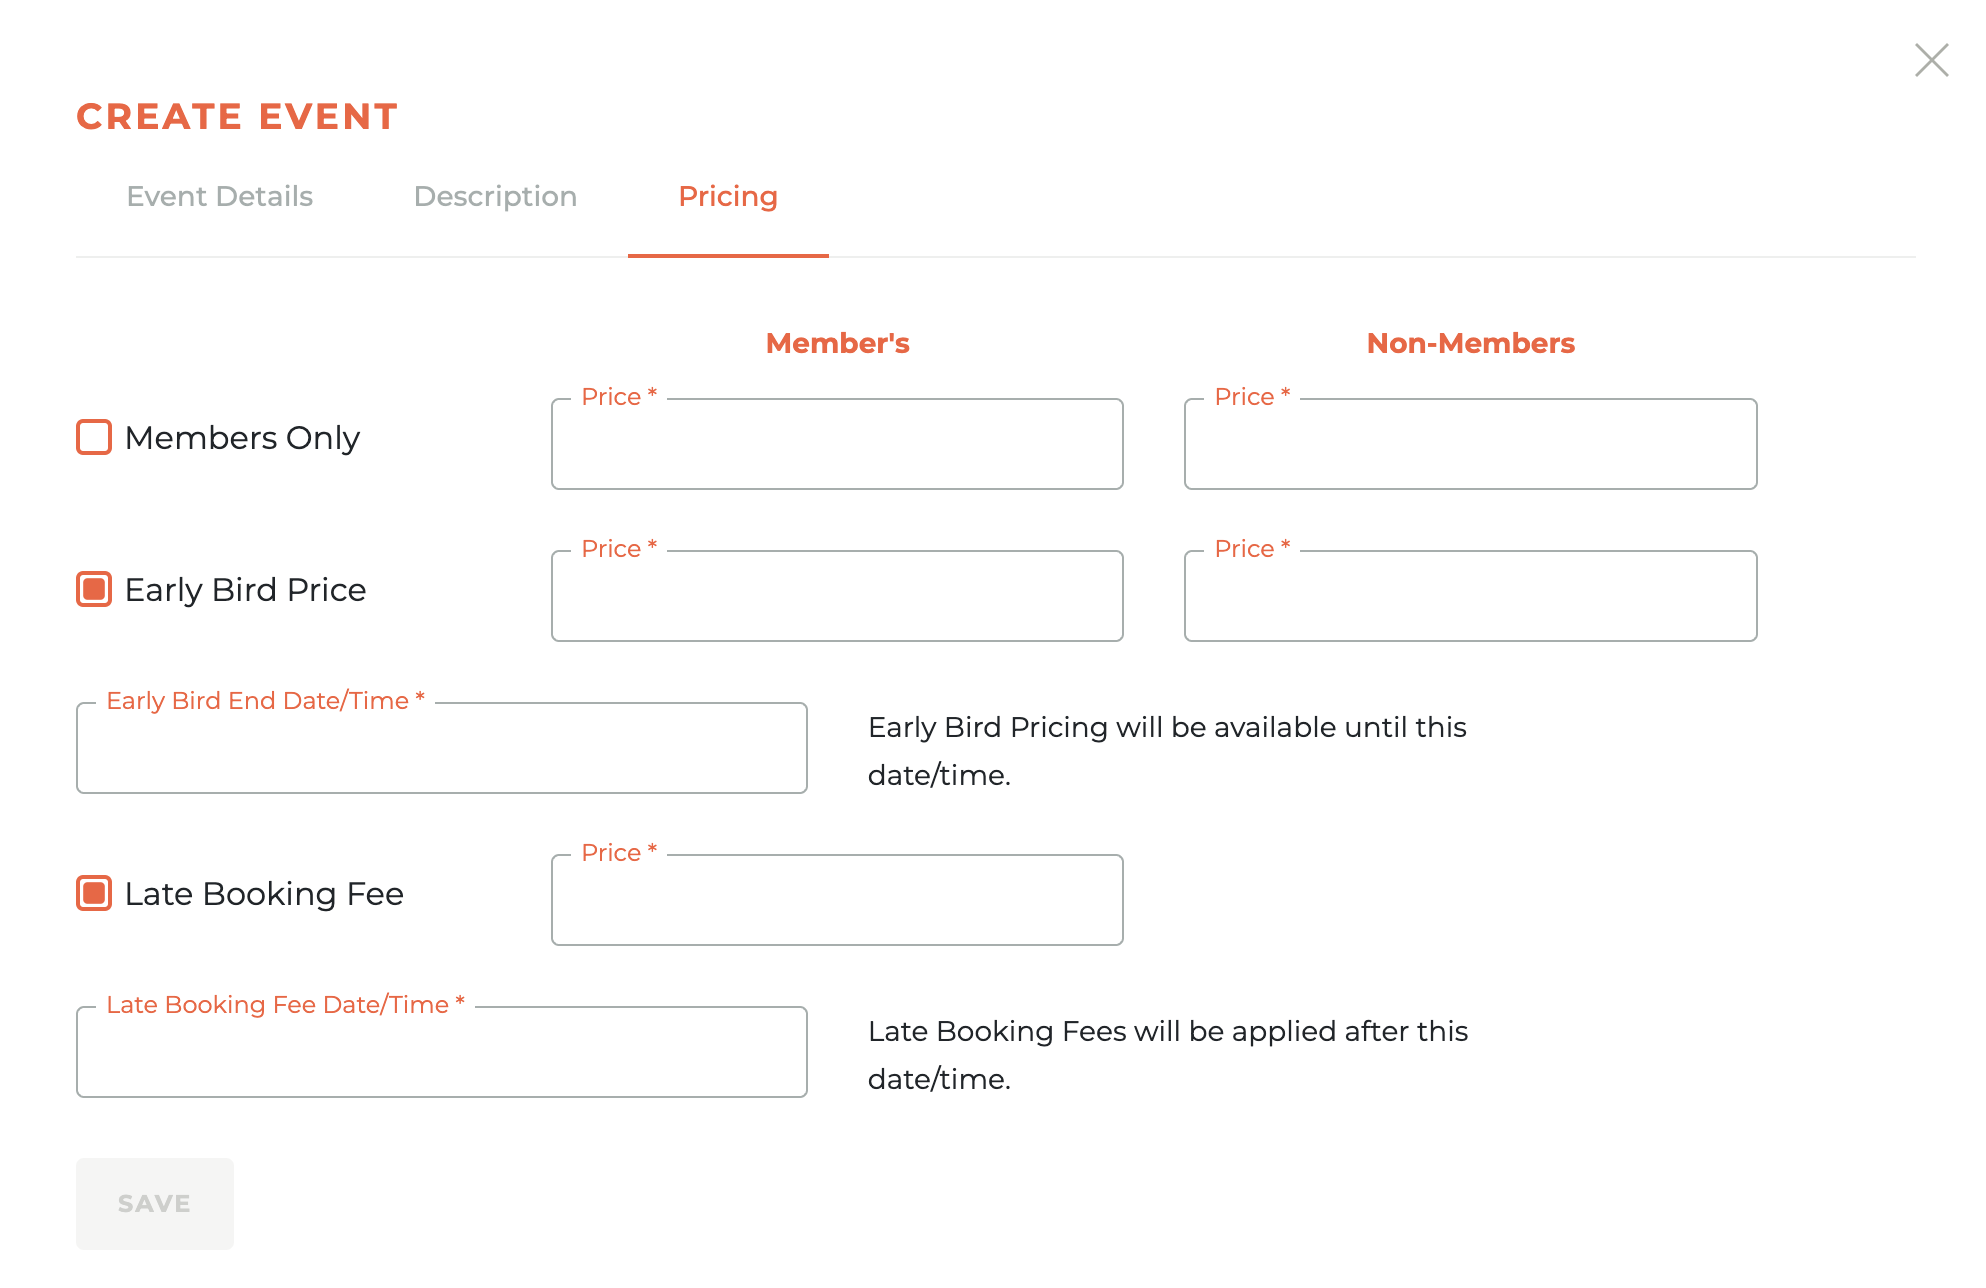
¶ Step 3: Pricing
The second step is to input pricing information. This step allows you to determine who can attend, whether there is different pricing for members and non-members and whether there is an early bird price or a late booking fee.
¶ Working With Existing Events
Draft Controls: Edit - | Delete - | Duplicate - | Notifications - | Segments - | Manage Speakers - | Sponsorships - | Registration Link -
Active Controls: View - | Duplicate - | Notifications - | RSVPs - | Finalize - | Segments - | Cancel - | Manage Speakers - | Sponsorships - | Registration Link -
Closed Controls: View - | Duplicate - | RSVPs - | Segments - | Manage Speakers - | Sponsorships - | Registration Link -
¶ - Editing & Viewing Event Details & Pricing
An event can be edited as long as it is in draft mode. Clicking on the - - Edit icon will cause the Edit Event window to slide out from the right side of the dashboard. You have all of the same controls as appear in the Create Event window above. Once an event has been made active or closed, the Edit icon changes to a - - View Icon. These windows look the same, except one can be edited and saved and one is for viewing only.
¶ Deleting An Event
An event can only be deleted while still in draft mode. When you click on the - - icon, a modal window will pop up to warn you that you are about to delete this event.
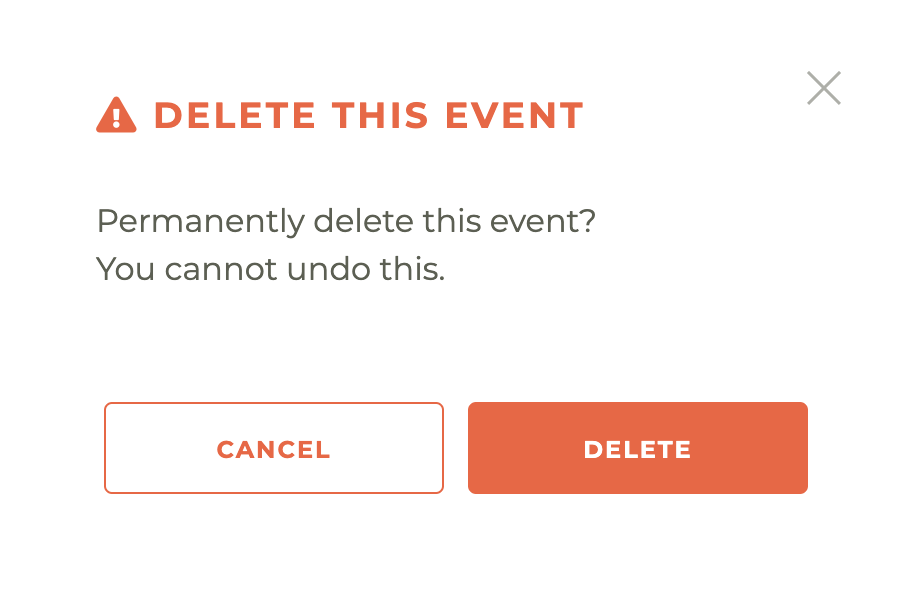
Please note: This action cannot be undone, not even by a member of the Tangilla staff. The only way to retrieve a deleted event is to create it again.
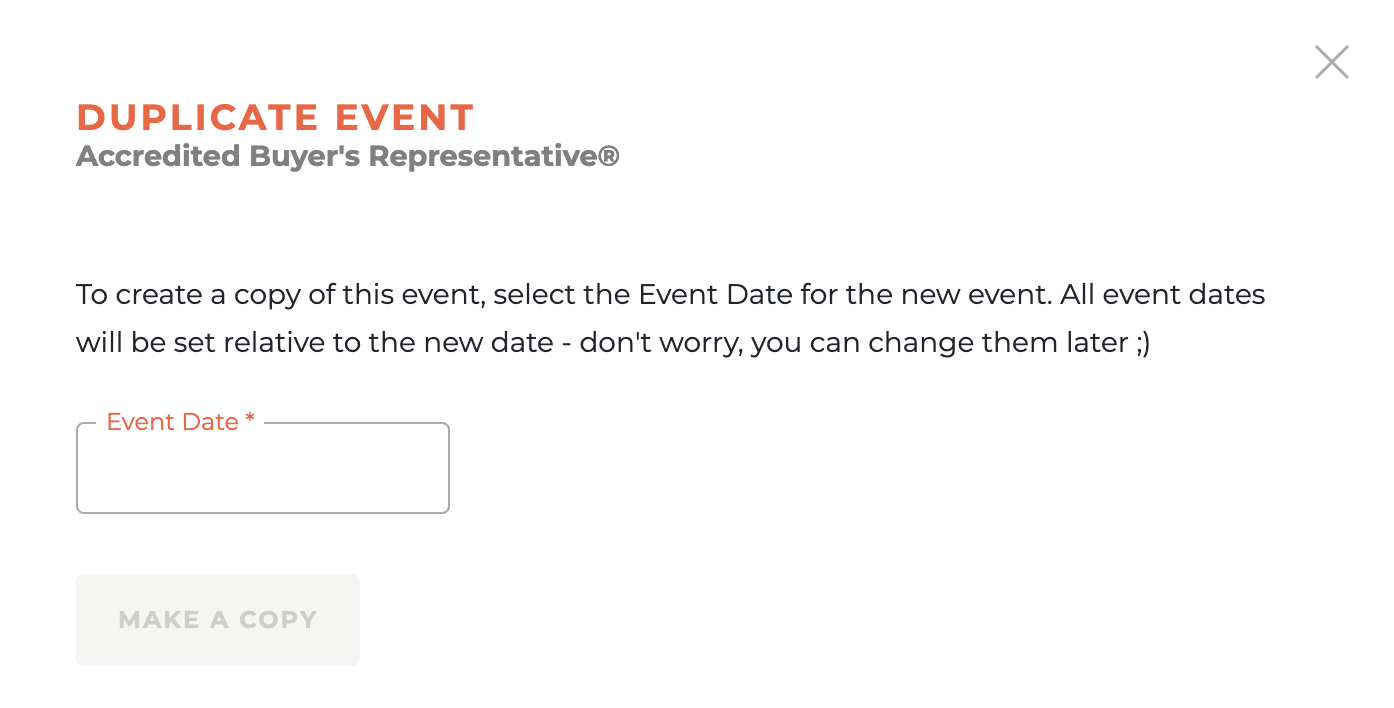
¶ Duplicating An Event
When you click on the - - icon, the Duplicate Event window will slide out from the right side of the dashboard. Any event in any status can be duplicated.
To create a duplicate of any event, select the Event Date for the new event. When you save, all associated dates will be set relative to the new event date. You can change any of those once your selected event has been duplicated by simply editing that duplicated event that will now be in Draft mode in the event dashboard.
¶ Event Notifications
Clicking on the - - icon will cause the Event Notifications panel to slide out from the right side of the dashboard. You can view existing notifications

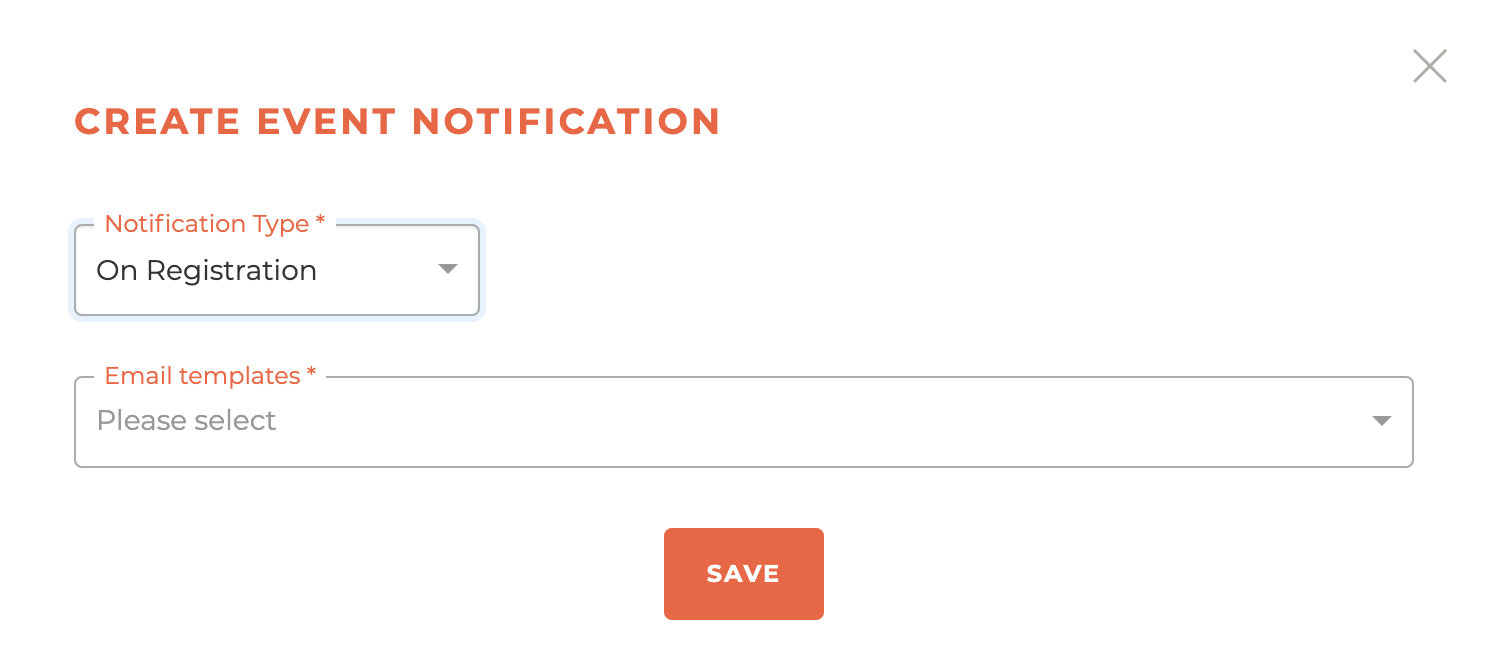
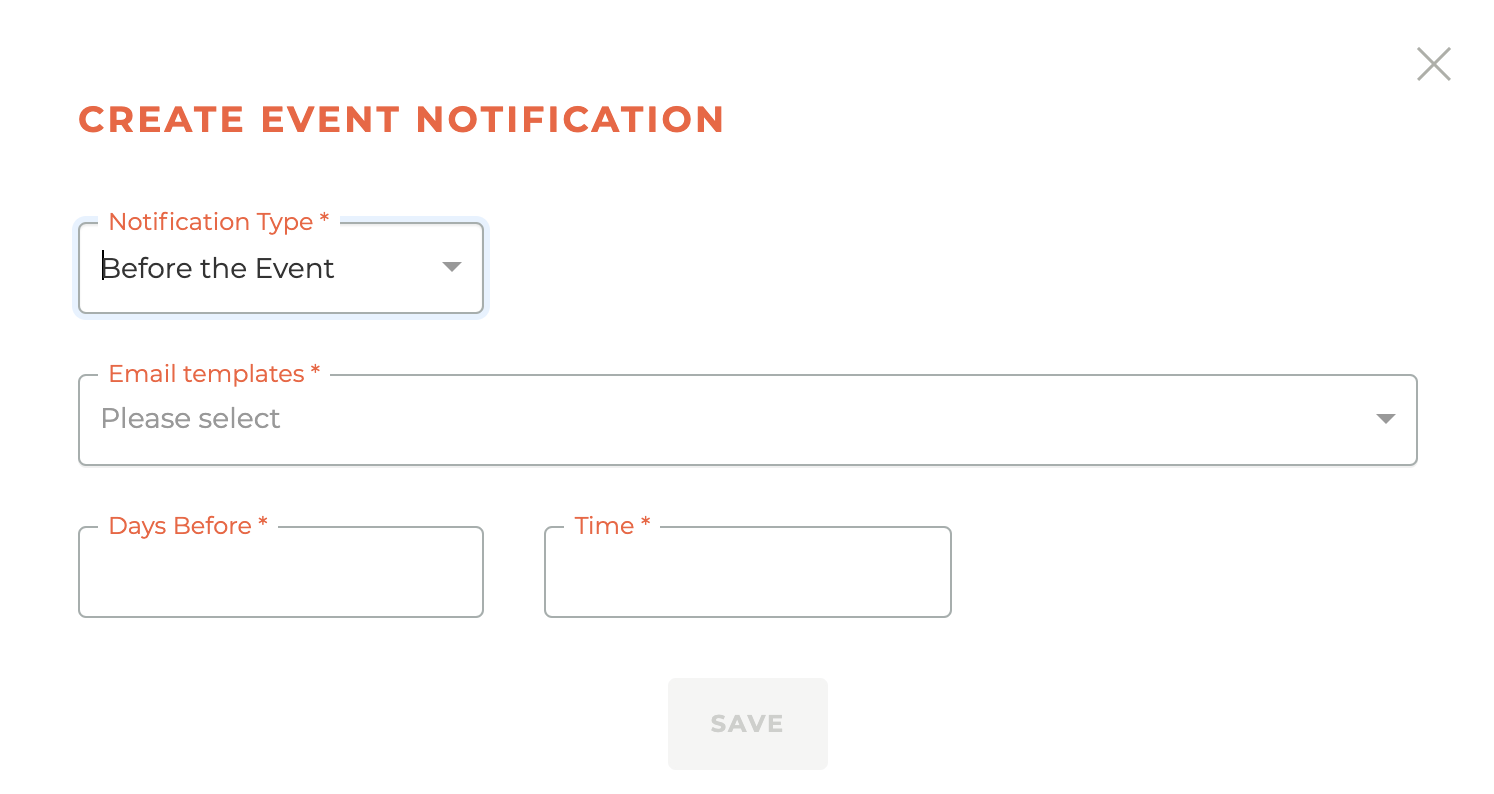
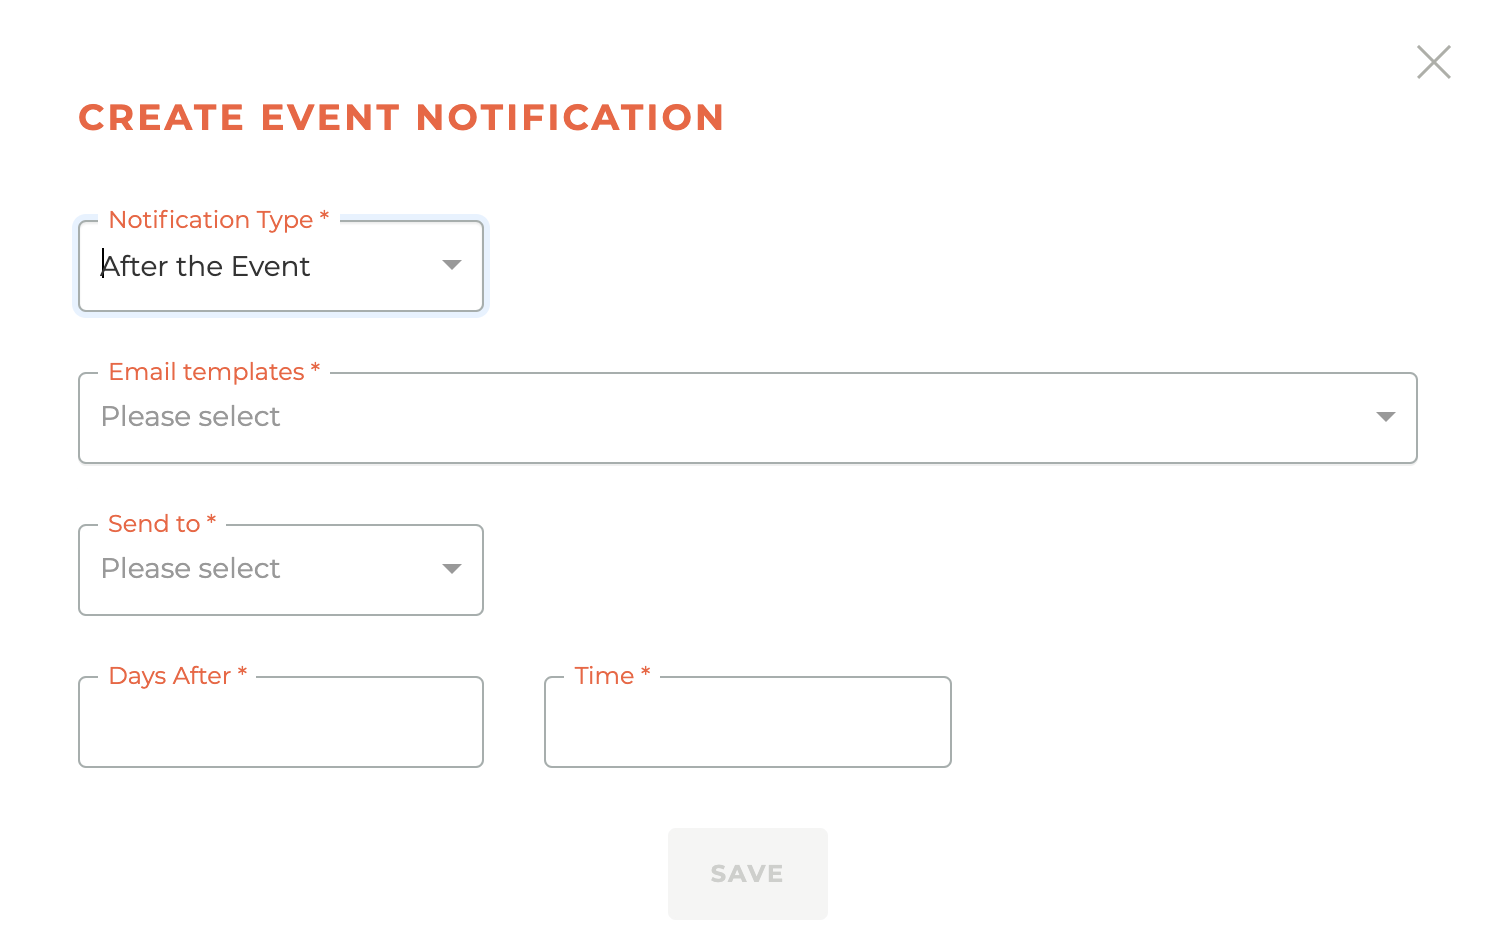
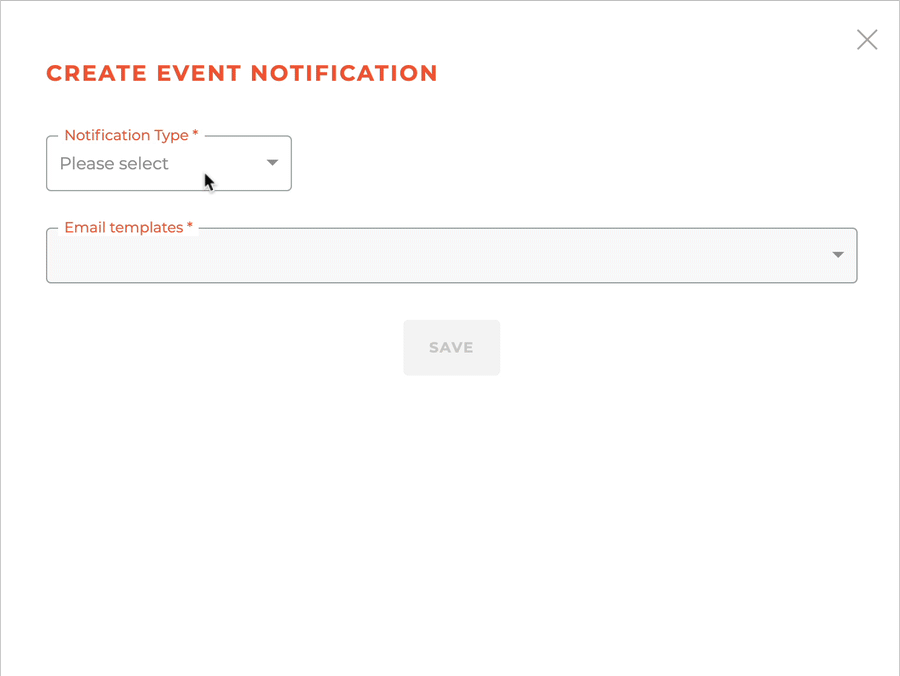
¶ Creating Event Notifications
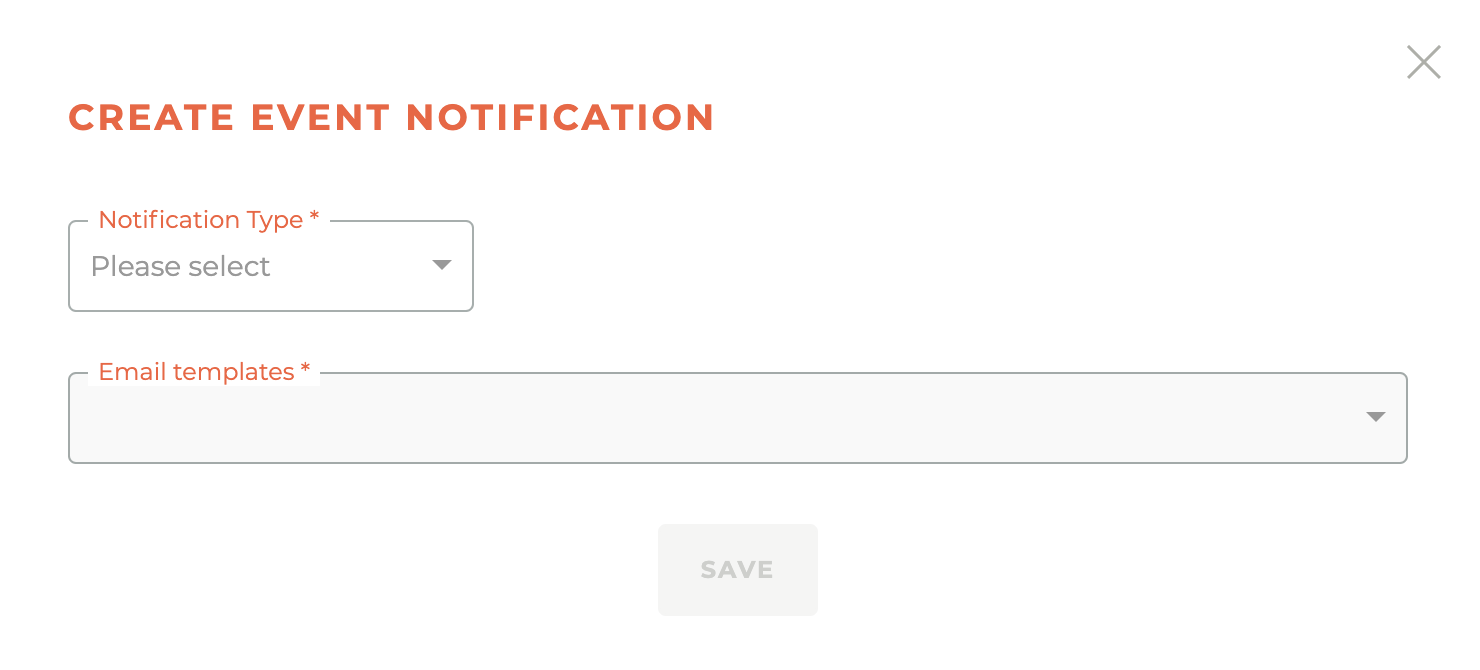
Every event "notification type" exposes different options in the Create Event Notification window, including email template optikons, audience selection and dates for sending the notifications.
The event notification types are On Registration, Before the Event, After the Event, Change Location/Room, Change Date, and Cancel Event. Change Location/Room, Change Date, and Cancel Event are used for making changes to a class or event that is already live and has RSVPs. This will notify each RSVP of the change being made.
¶ On Registration
¶ Before the Event
¶ After the Event
¶ Change Location/Room
Once completed this will notify all RSVPs about the change of location.

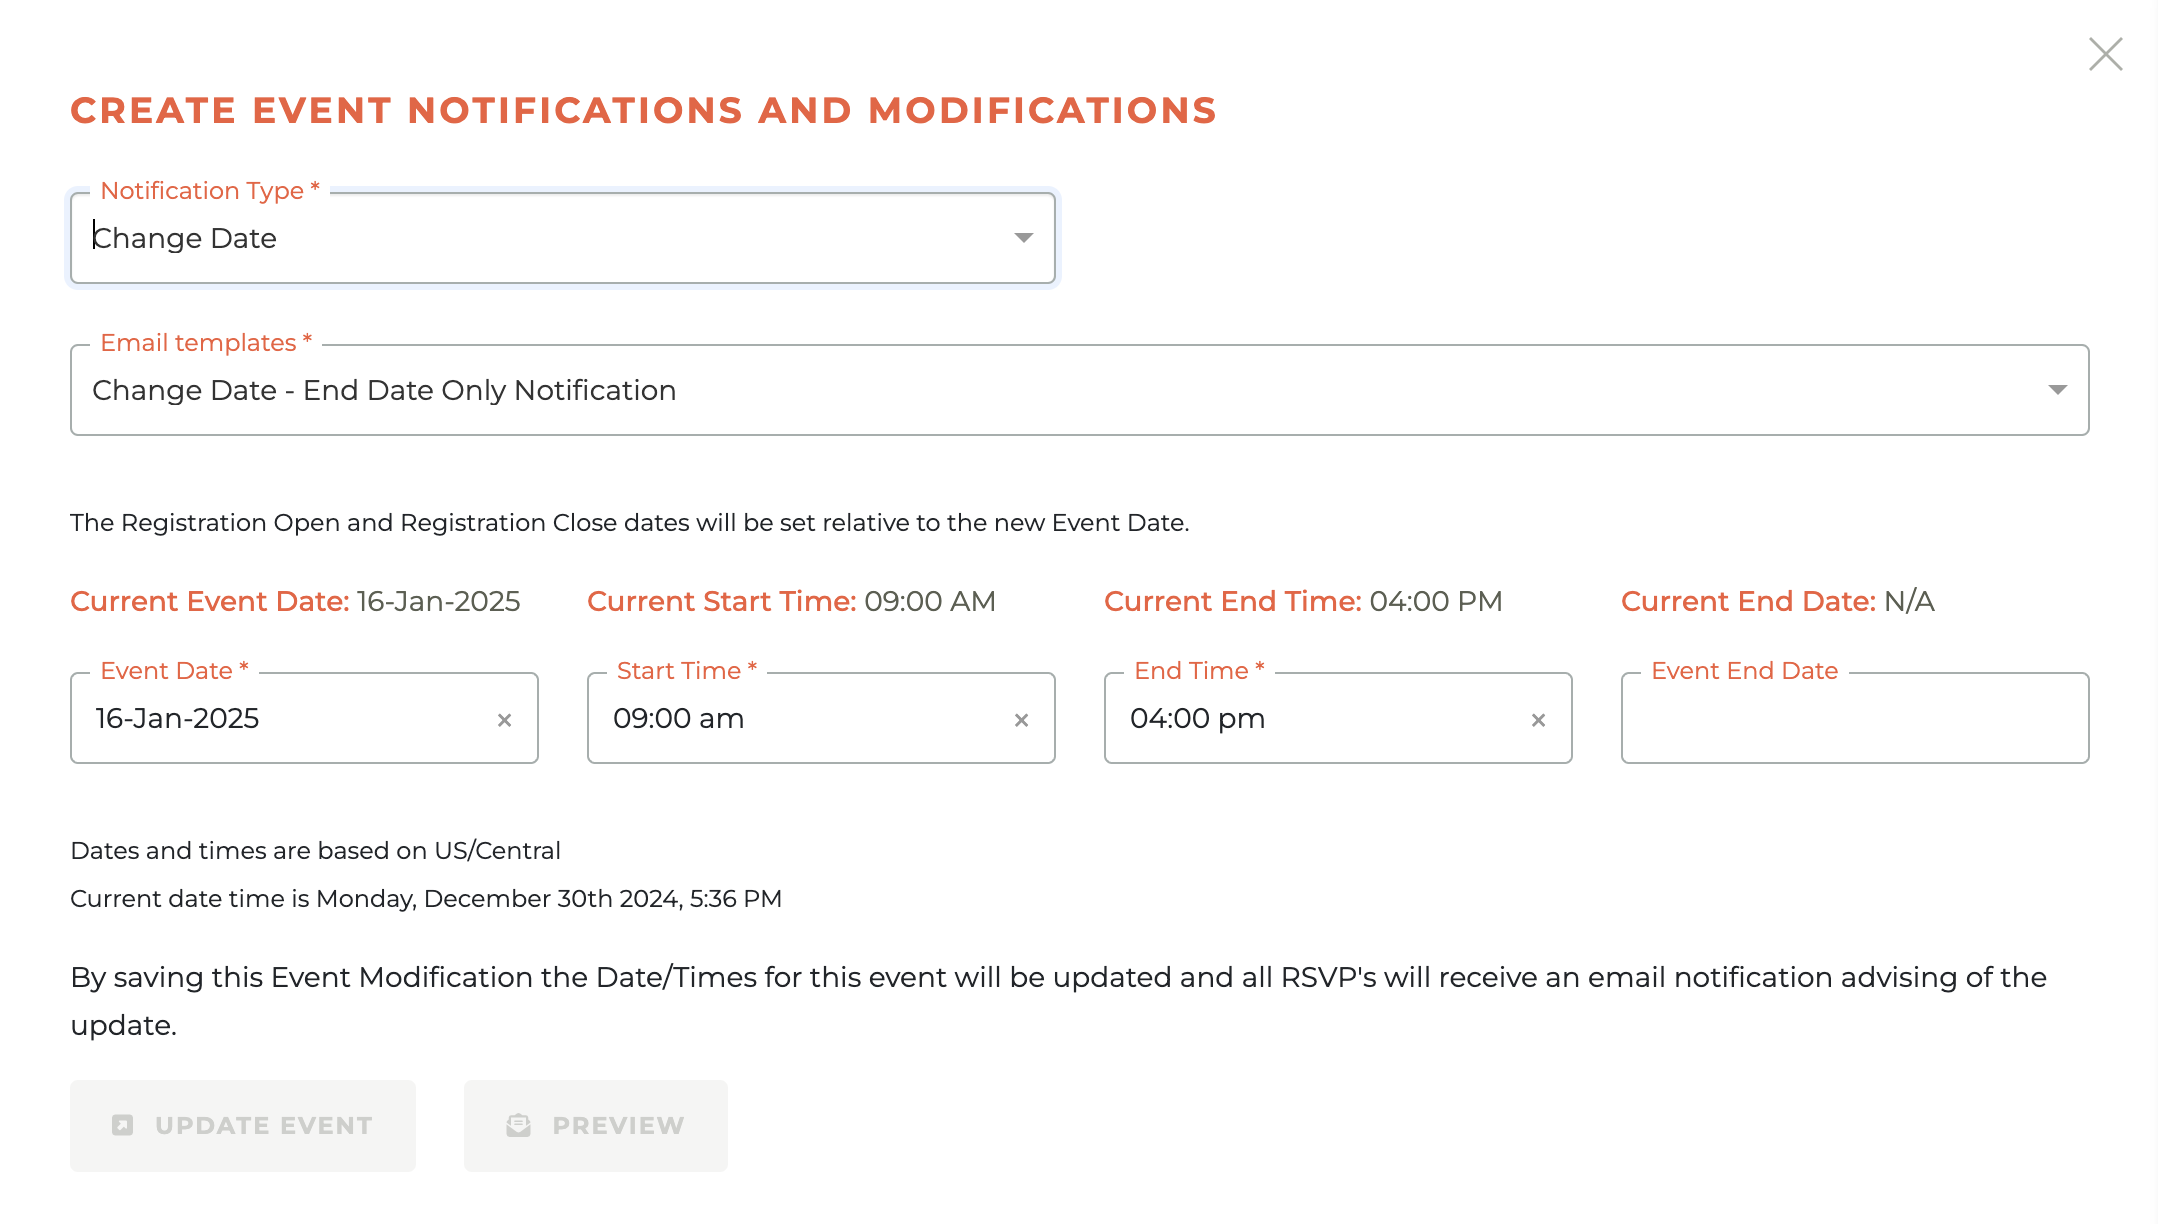
¶ Change Date
Once completed this will notify all RSVPs about the change of date/time.
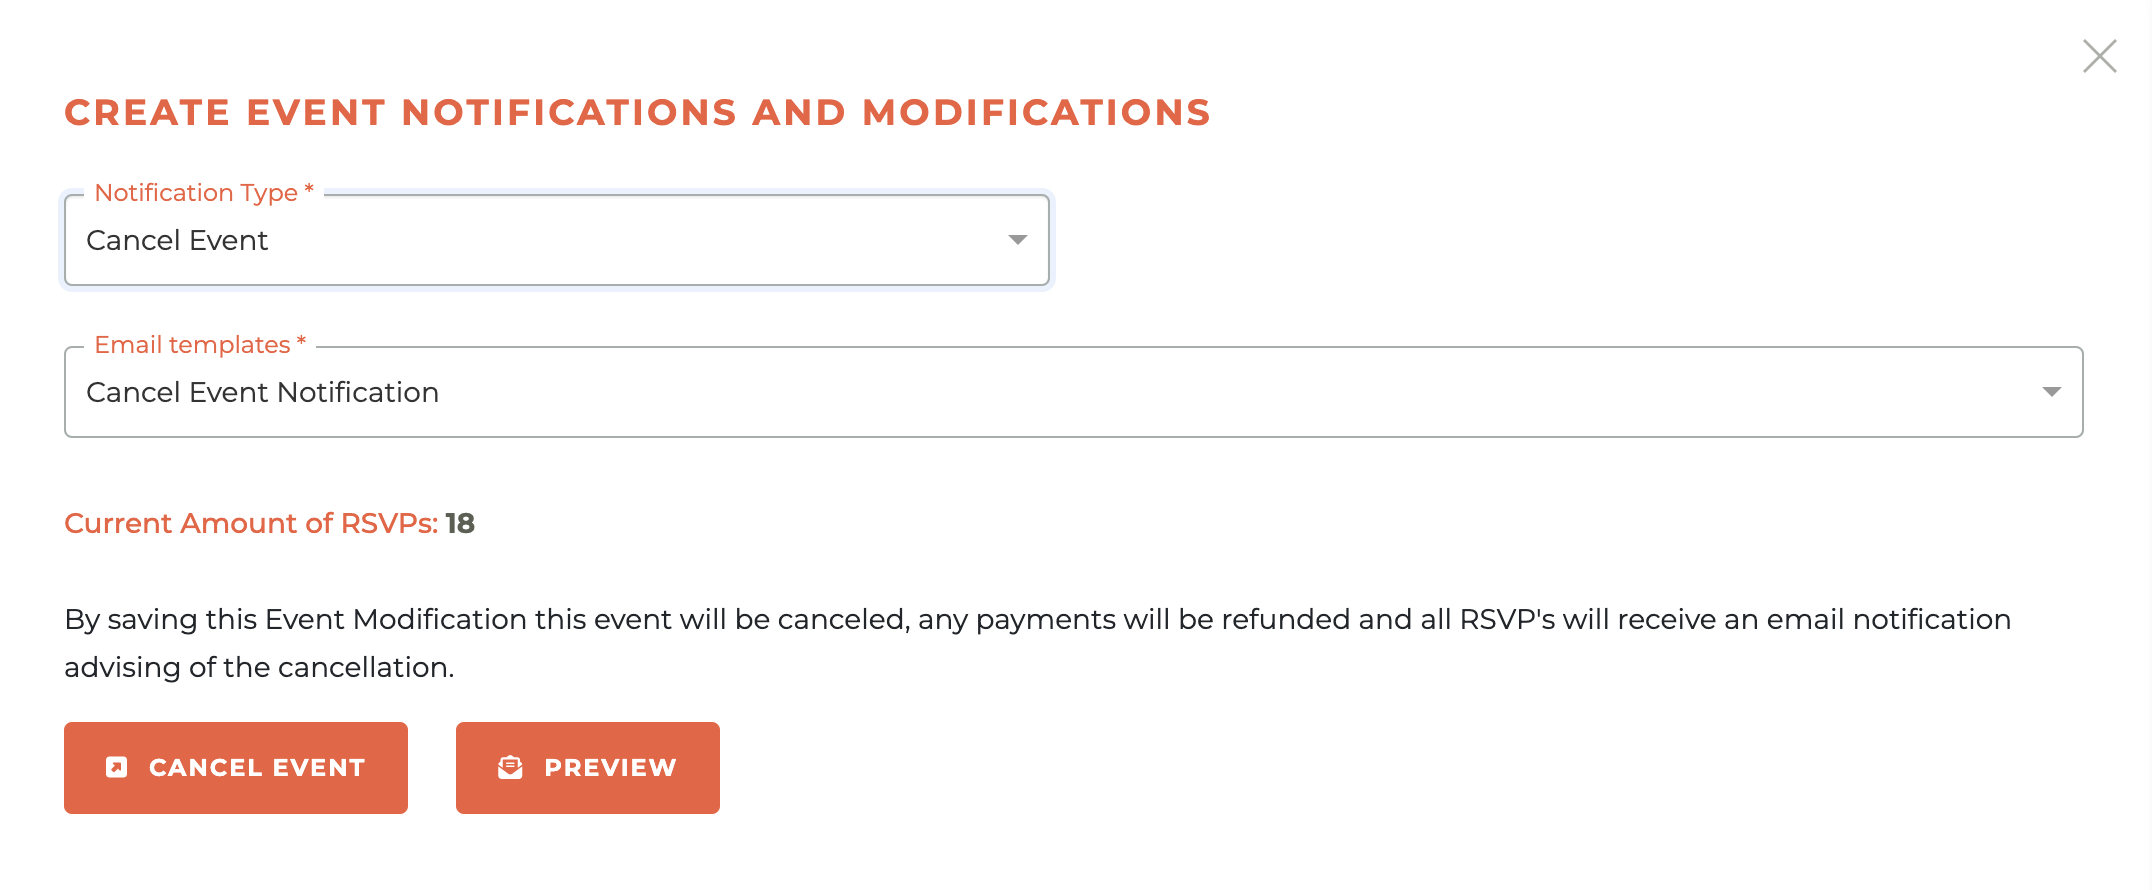
¶ Cancel Event
This notification screen alerts you to how many people have an RSVP for the class and once completed this will notify all RSVPs about the cancellation of the event and refund any payments made.
¶ Email Templates
Your association will have predefined system level templates for these notifications that will appear as options in the "Email Templates" field. You can see how this works in the animation below. The save button will not be active until you have filled out all of the required fields.
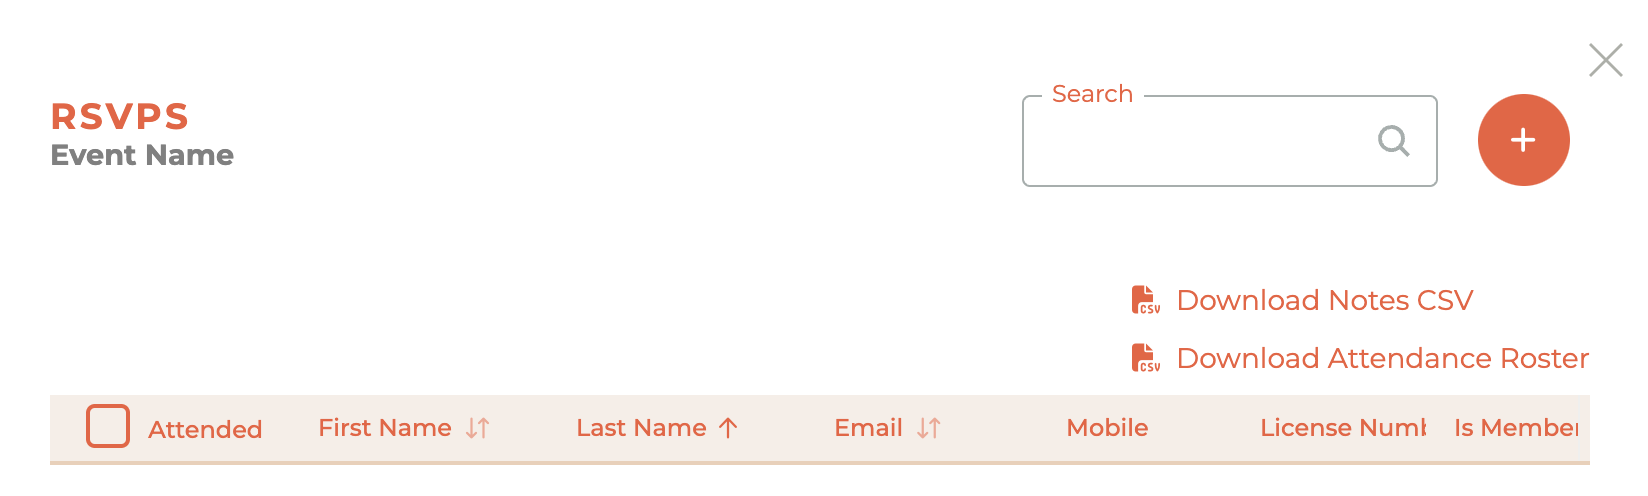
¶ Managing RSVPs
To see who has responded to attend a class and mark their attendance, click on the Clipboard - - icon and it will cause the RSVPS window to slide out from the right side of the dashboard. You may select who has attended using this window and it will automatically mark them as attended when you are ready to finalize a class.
¶ Creating A Staff RSVP (No Charges)
Clicking on the Plus icon will open a slide to search a person to add to the RSVPs.
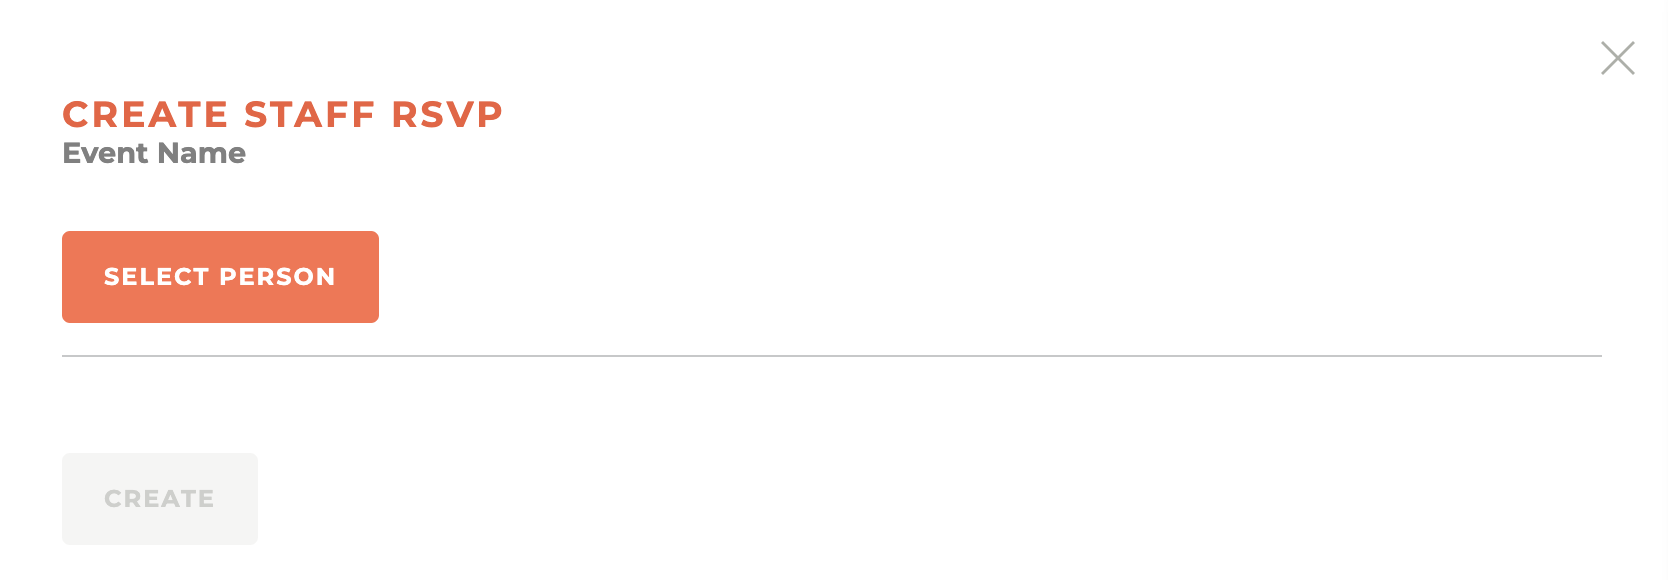
Once selected, the person will be added to the event and no charges will be applied.
¶ Finalizing An Event
Finalizing an event is a simple process and is really just a way of understanding who among the people that RSVPd actually attended the event, if you so desire. There is also a notes icon for each attendee.
You can mark all as attended and then unchieck those who didn’t show up. There are also options to download a CSV of notes or the finalized roster.
¶ Adding A Segment (Desired Audience) To An Event
You can limit who can see (and therefore participate in) an Event in the portal by adding a segment to the event. For example, if you only want the event to be available to Limited Referral Agents, then you would add a segment that only included Limited Referral Agents. Only one segment can be added to any event. Segments can be added or changed on any draft or active event. To add a segment click on the Pie Chart - - icon next to the event you wish to add the segment to. This will cause the Select An Audience For This Event window to slide out from the right side of the screen.
Once you have chosen add or change a segment, the Add Segment window will appear and provide you with your options. You may search by segment name and filter by segment category. Only published segments can be selected. These segments are managed in the segments module of Tangilla. Choose the segment you wish to add by clicking on the + sign next to the Segment.
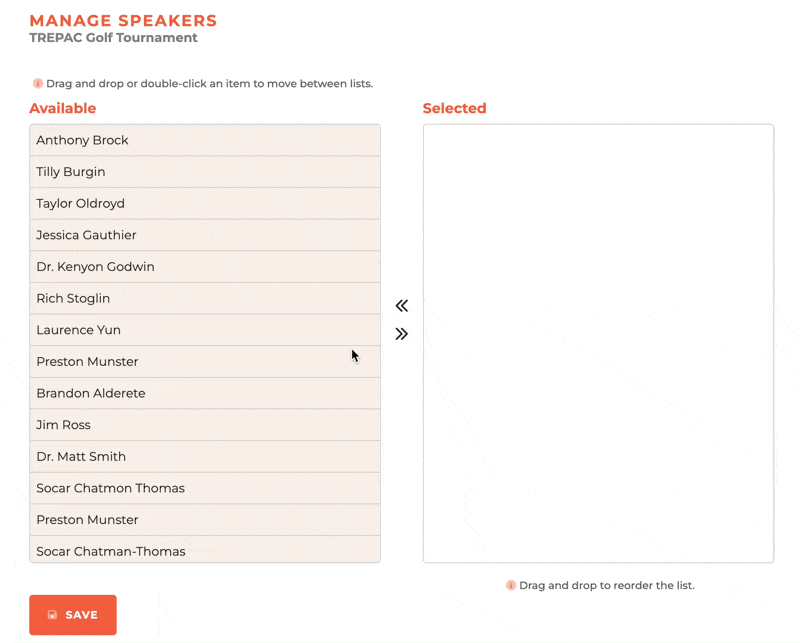
¶ Managing Speakers
Speakers for events are easy to manage at any time. Click on the elipses to expose the additional options and then select Manage Speakers. This will expose the Manage Speakers window which will slide out from the right side of the screen. Drag the speakers you wish to have part of the event from the "Available" side to the "Selected" side and then click Save.
¶ Registration Link
To get to your "deep link" that will take a user to the specific event for registration, click on the Link - - icon and you'll be presented with the event details and a copy link option.
¶ Frequently Asked Questions
| # | Question | Answer |
|---|---|---|
| 1 | How can I search for or filter events on the dashboard? | You can search for events by name and filter by their status: Draft, Active, Closed, or Cancelled. |
| 2 | How do I create a new event? | Click the Plus icon in the upper right corner to open the Create Event panel, which includes three steps: Event Details, Description, and Pricing. |
| 3 | What is Multi Booking in events? | Multi Booking allows a member to reserve spots for other members or non-members (if allowed). For members-only events, they can only book for other members. |
| 4 | Can I edit an event after creating it? | You can edit an event only while it's in draft mode. Once active or closed, you can only view the event details. |
| 5 | How can I delete an event? | Events can only be deleted in draft mode by clicking the trash icon. Deletion is permanent and cannot be undone. |
| 6 | Can I duplicate an event? | Yes, any event regardless of status can be duplicated. Select a new date during duplication and all related dates will adjust accordingly. |
| 7 | What types of notifications can be created for events? | Notification types include: On Registration, Before the Event, After the Event, Change Location/Room, Change Date, and Cancel Event. |
| 8 | What happens when I finalize an event? | Finalizing marks which RSVPs actually attended. You can mark all as attended and then uncheck those who didn’t show. Options are available to download notes or rosters. |
| 9 | How do I manage who can see or join an event? | You can add a segment to an event to limit visibility. Only one segment can be added, and only published segments from the segments module can be used. |
| 10 | How do I assign speakers to an event? | Click the ellipsis icon, select Manage Speakers, then drag speakers from "Available" to "Selected" and save your choices. |
| 11 | What information is required in the Event Details step? | You need to input Title, RPAC status, Billing Type, Dates and Times, Room, Capacity, Registration window, Evaluation URL, and optional Multi Booking settings. |
| 12 | How do I style the event description? | In the Description step, you can style the text with bold, italic, underline, strikethrough, and bullet or number lists. |
| 13 | Can I save an event without completing the pricing step? | No, you must complete the pricing section in step 3 before saving the event. |
| 14 | What options are available in pricing? | You can set different pricing for members and non-members, define early bird pricing, and apply late booking fees. |
| 15 | How do I manage RSVPs for an event? | Click the Clipboard icon to view RSVPs. You can mark attendees and use the finalization tool to manage attendance records. |
| 16 | Can staff add RSVPs without a charge? | Yes, staff can create an RSVP by clicking the Plus icon, searching for a person, and adding them without incurring any charges. |
| 17 | How can I notify attendees of a change in room or date? | Use the Change Location/Room or Change Date notification types to alert all RSVPs about modifications. |
| 18 | How does the Cancel Event notification work? | It notifies all RSVPs of the cancellation and processes refunds for any payments made. |
| 19 | What are email templates in event notifications? | They are predefined templates set by your association, used to quickly format and send event notifications. |
| 20 | How do I find the registration link for an event? | Click the Link icon next to an event to view and copy its unique registration URL. |
| 21 | Where do I get the Evaluation URL to add to an event? | Any link to a form or survey can be used as an evaluation URL. You can create the evaluation form using the Forms module inside Tangilla, or you can use any other form or survey creation tool you wish, so long as it can provide a URL for you to place in the Evaluation ULR field for an event. |