¶ Campaigns
The Campaigns dashboard provides you with access to all email campaigns created or sent.
¶ Search, Filter & Create
From the main Campaign screen you can search filter and create campaigns.

You may search on campaign name, and may filter on type, status, channel and category. Using a combination of search and filter will allow you to narrow down result easily. Clicking on the orange Plus icon will allow you to create a new campaign.
From the main window or from any filtered search, you can seqentially sort, up or down, the order of each of the columns by clicking in the column name box. The column being sorted will display an Up Angle if it is sorting Z - A or 9 - 1, and Down Angle if sorting A - Z or 1 - 9.
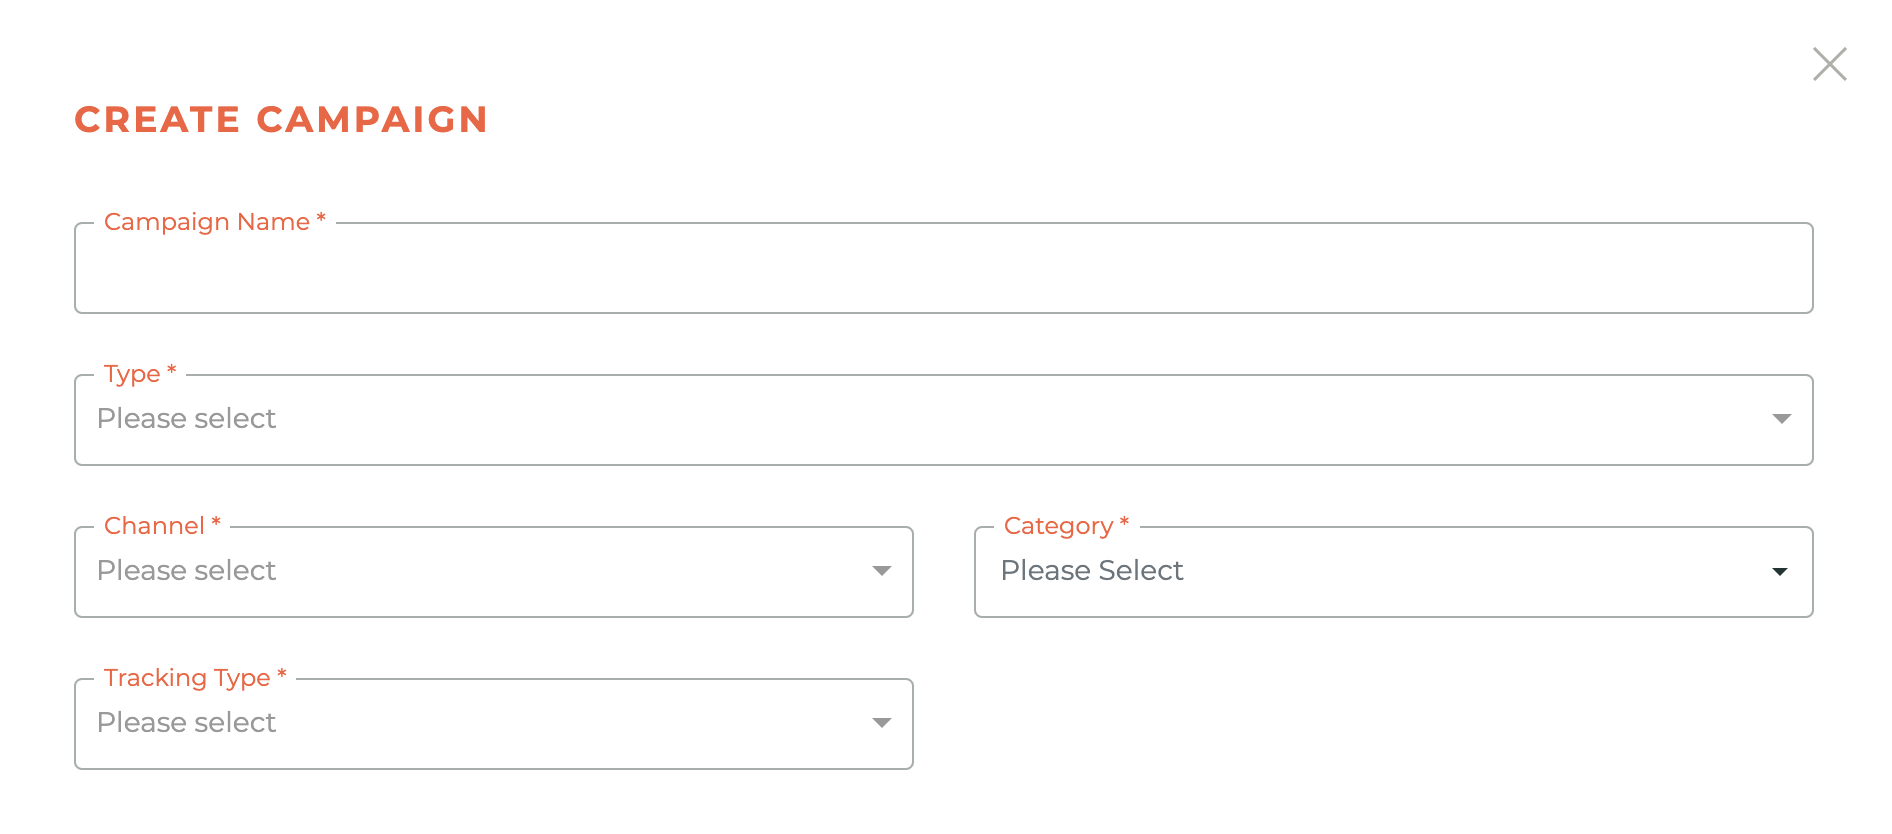
¶ Creating A Campaign
There are two sections of the create a campaign window, the information segment at the top and the audience selection at the bottom. The fields as the top of the page are for
- naming the campaign
- selecting the campaign type (Single, Drip and Series)
- selecting the channel for the campaign
- selecting the category for the campaign
- selecting your tracking options outside of the Tangilla platform.
¶ Campaign Types
- Single - send one email to a group of recipients.
- Drip Campaign - send multiple messages on a schedule relative to a recipient joining a campaign, based on the segment you have selected.
- Series Campaign - send multiple messages on specific dates and times, regardless of the time they joined the campaign. These are for a specific date range.

Please note: Drip Campaigns and Series campaigns both interact with a segment in the same way. They recognize when somoene ENTERS a segment, but NOT when someone EXITS a segment. So, if you are wishing to recognize that there may be fewer people in a segment over time, you will need to set up multipe singel email campaigns or multiple Drip Campaigns that only contain a single email. Each campaign will then look at who is in that segment at the time of launch.
¶ Campaign Channels
Campaign channels are created in the Channels Section of the Communication Module. You can find specific instructions here. They are used to allow members to opt out of specific communications.
The channels are selected as part of the envelope creation or edit process.
¶ Campaign Categories
Campaign categories are a way for you to group campaigns in any way you see fit. Categories can be created on the fly from inside the Envelope creation or edit process, or you can choose from previously created categories.
¶ Campaign Edit Options
Your options for editing a campaign are controled by its status, Draft, Sent, Active or Paused. Hovering your mouse over any icon will display a tool tip. A longer description is provided below.
Draft Status Opions
In "Draft" you have the following options displayed to the right of the campaign category column.
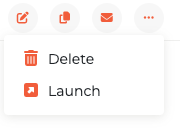
The - - icon allows you to edit the campaign details. This is only available while the campaign is in draft mode. The - - Copy icon allows the duplication of the campaign. The - - Envelope icon allows you to edit the email envelope or envelopes, depending on the campaign type. Editing the mail envelope or the email itself is only allowed in draft mode. The - - Trash icon allows you to delete the campaign and is only visible in draft mode. And the - - Link icon allows you to launch the campaign.
Sent Status Options
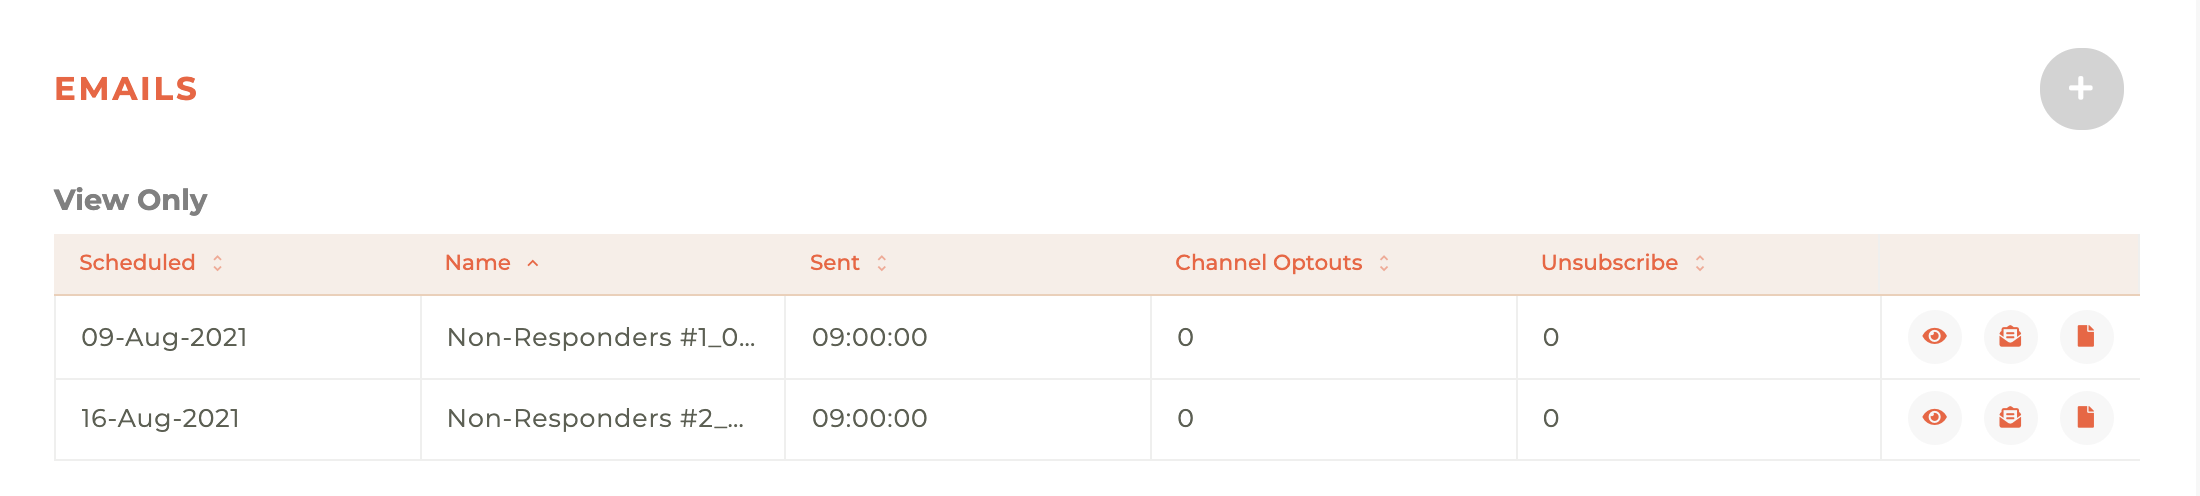
In "Sent" you have the following options displayed to the right of the campaign category column.
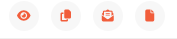
The "Sent" status is only applied to single campaigns once they have been launched. The - - Envelope Open icon allows you to view the campaign envelope. The - - File icon allows you to view a report on the campaign. The - - Copy icon allows the duplication of the campaign.
Active Status Options
In "Active" you have the following options displayed to the right of the campaign category column. The - - Copy icon allows the duplication of the campaign.

The "Active" status is applied to drip and series campaigns once they have been launched, the - - Envelope Open icon allows you to view the campaign envelope details. The Copy icon allows the duplication of the campaign. The - - File icon allows you to view a report on the campaign, and the - - Paue icon allows you to pause the campaign. Clicking on the pause icon will cause a - - "caution" window to display with this message: "Are you sure you want to pause this Campaign? This will stop future delivery for this Campaign until it is relaunched." Putting a campaign in Pause will not enable editing of the emails in the campaign, however. You will need to duplicate the campaign to make changes, then relaunch.
Paused Status Options
In "Pause" status you have the following options displayed to the right of the campaign category column.

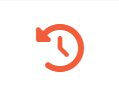
The Envelope icon allows you to view the campaign details. Editing the campaign details is only allowed in draft mode. The - - File icon allows you to view the email envelopes. Editing the mail envelope is only allowed in draft mode. The - - Trash icon allows you to delete the campaign and is only visible in draft mode. The - - History icon will change the campaign status back to draft. The - - Copy icon allows the duplication of the campaign. And the - - Launch icon allows you to launch the campaign.
¶ Add Email Envelopes & Set Delivery Times
Once you've created your campaign, you will need to create envelopes for the emails in that campaign. This is true for every type of campaign, single, drip or series. Clicking On the - - Plus icon in the upper right hand corner will allow you to add an email envelope for a campaign.
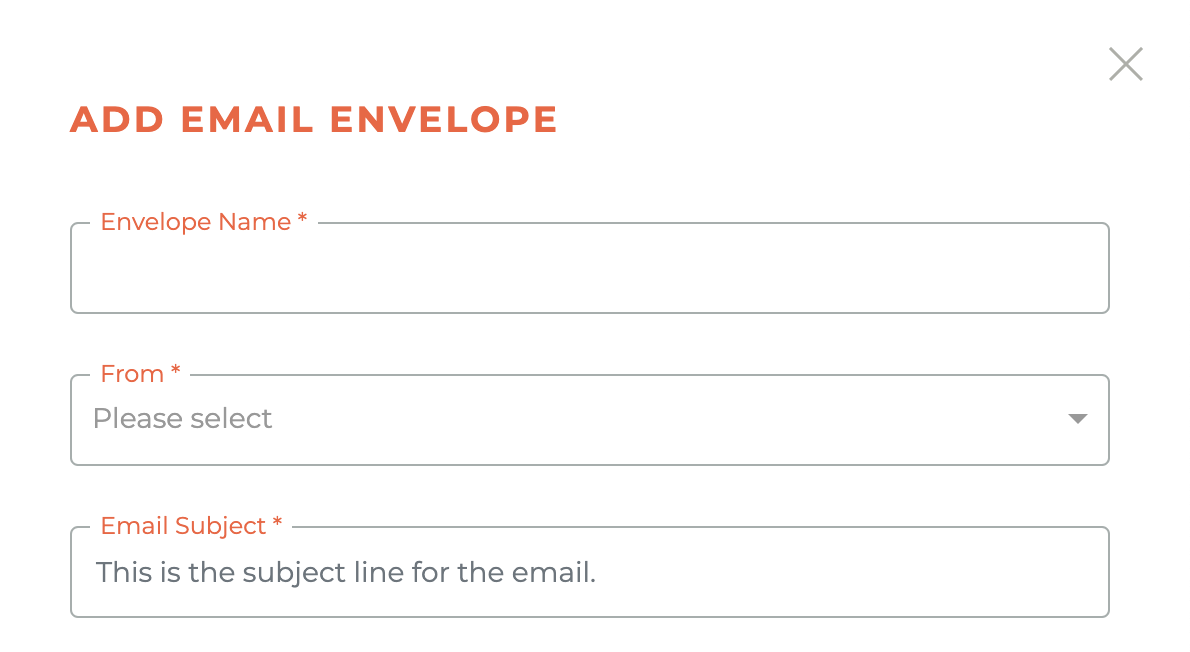
Please note: If you wish to personalize the Email Subject with information unique to the member receiving the email, you can include the merge tag from the email in the subject line and it will also populate with that information. For example, if you want to address the person receiving the email by their firs name, you would do it by adding the {{first_name}} tag in the Email subject. Any of the merge tags available will work.
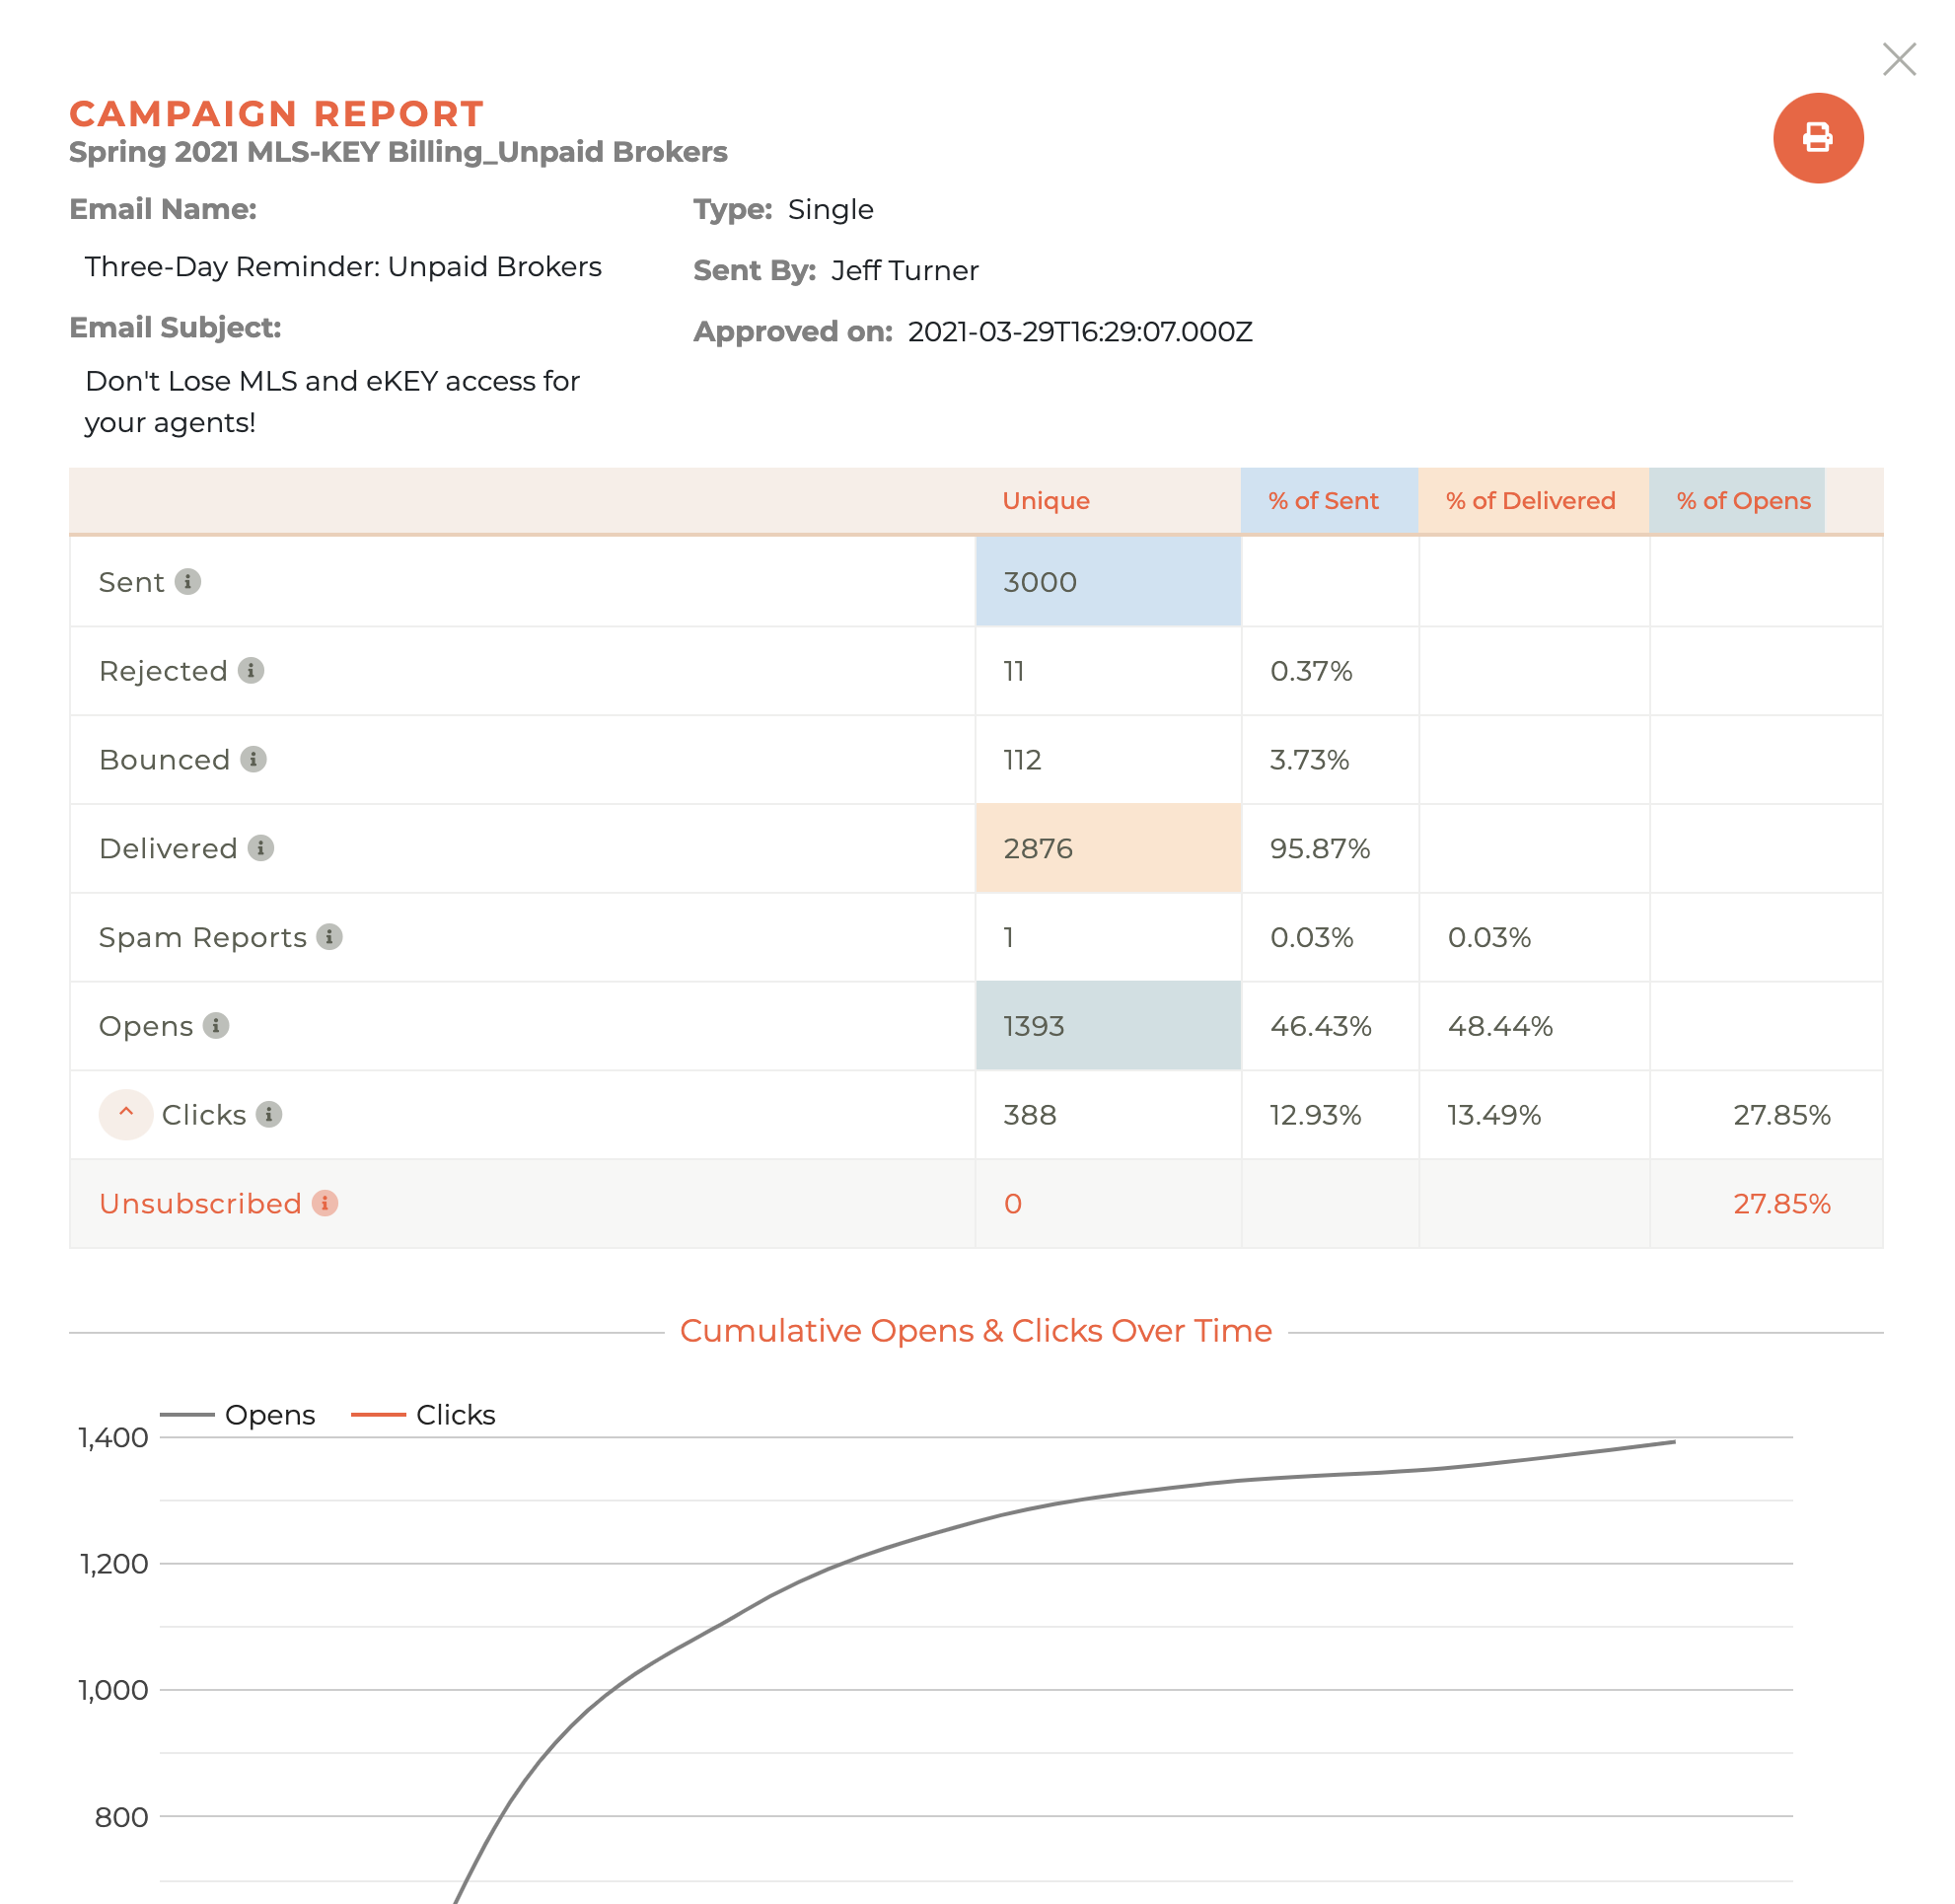
¶ Email Reports
Clicking on the - - File icon will take you to the email report for that campaign. This form can be viewed on screen in the window the slides out from the right side of the dashboard, or printed.
¶ Drip and Series campaign send dates are controlled in the envelope for each email in the drip or series.
Drip campaigns work based on a set time from inclusion in the segment you've chosen. When a recipient joins a drip campaign, they receive messages in order based on the relative number of days since they joined the campaign. 'Send on day...' manages this schedule.
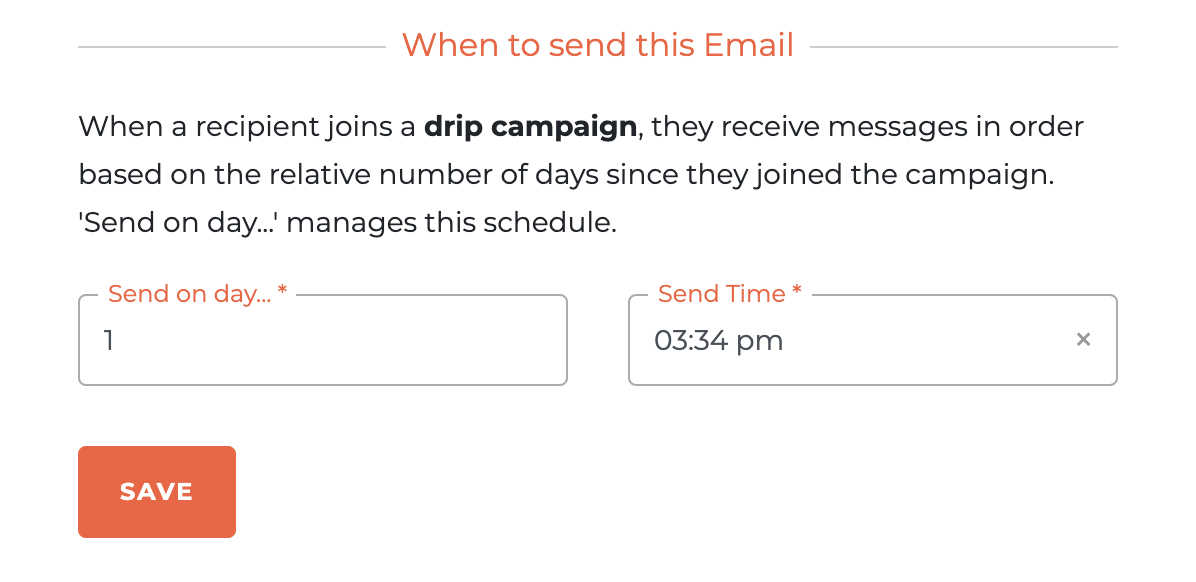
If you want to have an email sent the moment someone enters a segment, as with a New Member for example, you would set the "Send Date" to 0. This eliminates the required "Send Time" and will send the drip email the moment someone enters a segment.
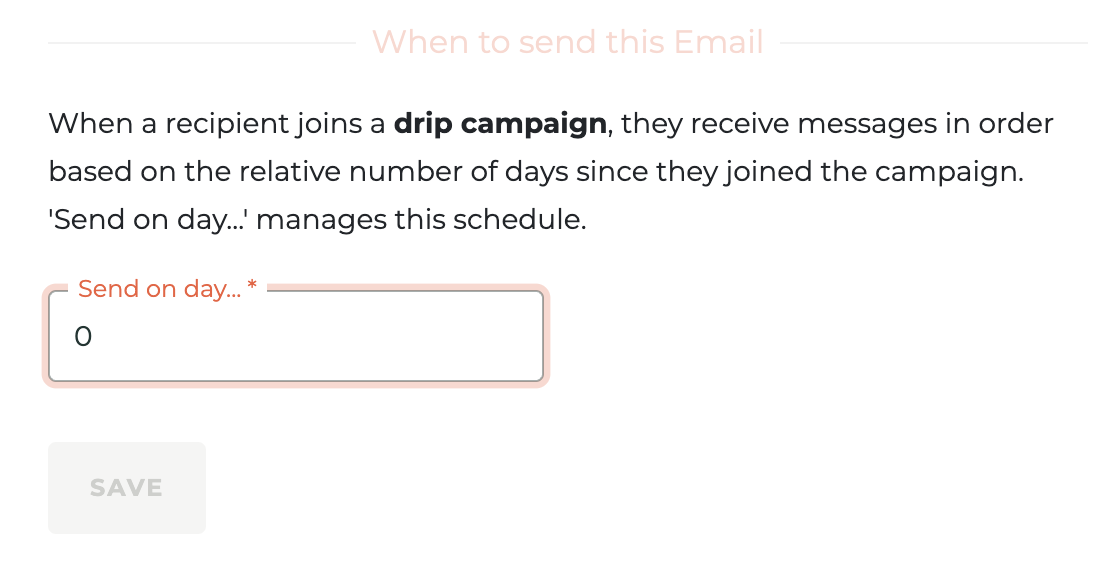
If you are using a Drip Campaign with a Segment and set a "Send Date" of DAY 0 it will ignore the "Send Time." If your intent is to send the drip email immediately upon entry, this will require the use of the webhooks.
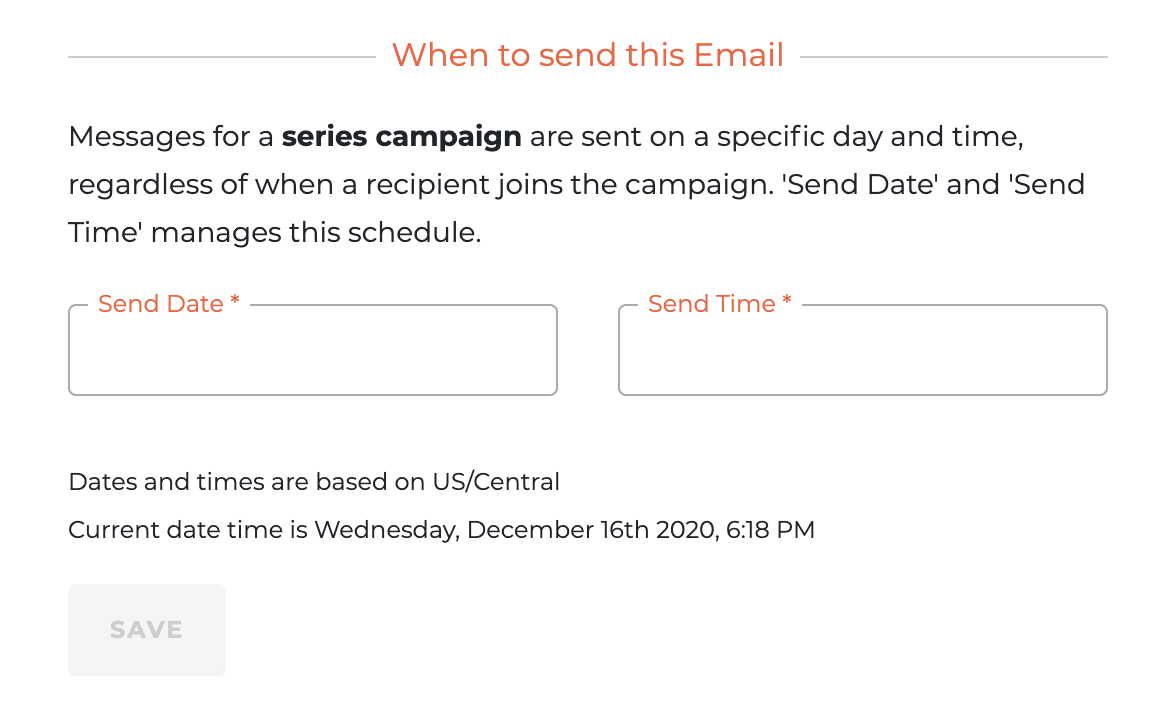
Series campaigns send emails during a specific time period, therefore messages for a series campaign are sent on a specific day and time, regardless of when a recipient joins the campaign. 'Send Date' and 'Send Time' manages this schedule.
If people are removed from a segment used by a Series campaign after the campaign starts, they will still receive the email. They cannot be removed from a series campaign.
¶ Single Email Campaigns Are Different.
Timing for sending a single email campaign is not controlled in the envelope. Timing for a single drip campaign is controlled at launch . A single email may be sent at a specific later date or immediately.
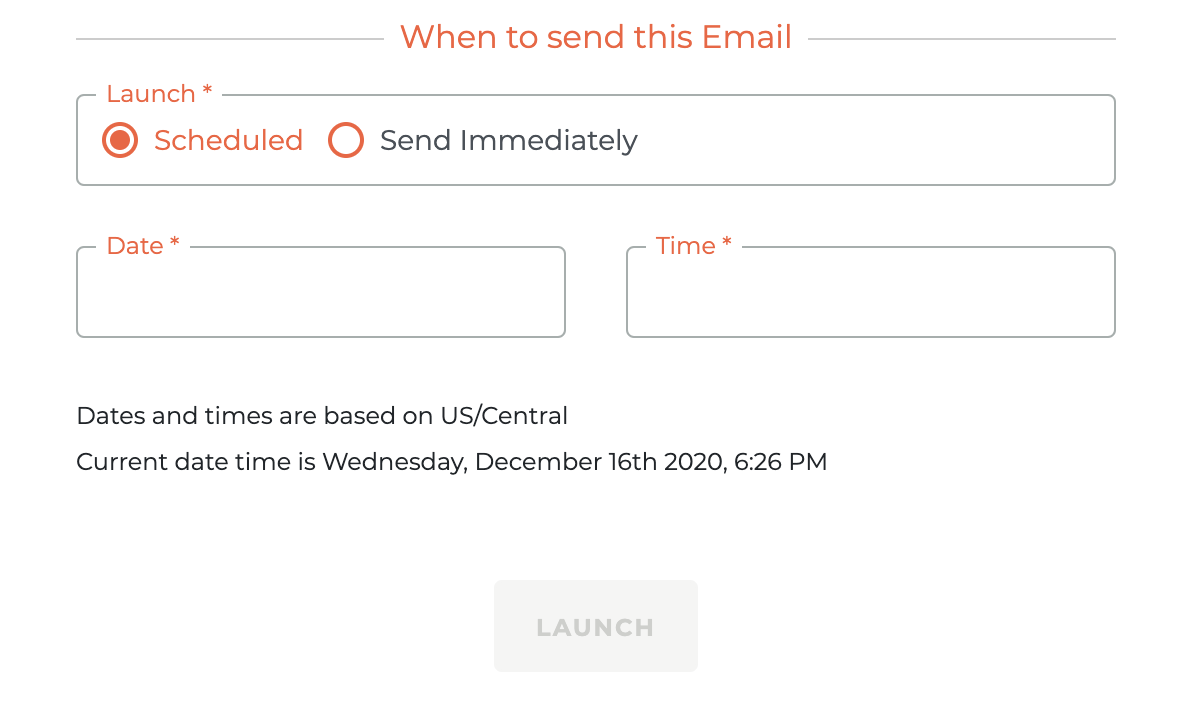
If launch is successful, you will receive a success message. If it fails, you will receive a fail message.
¶ & Adding Tracking To A Campaign (Single, Drip, & Series)
¶ Single Campaign Tracking
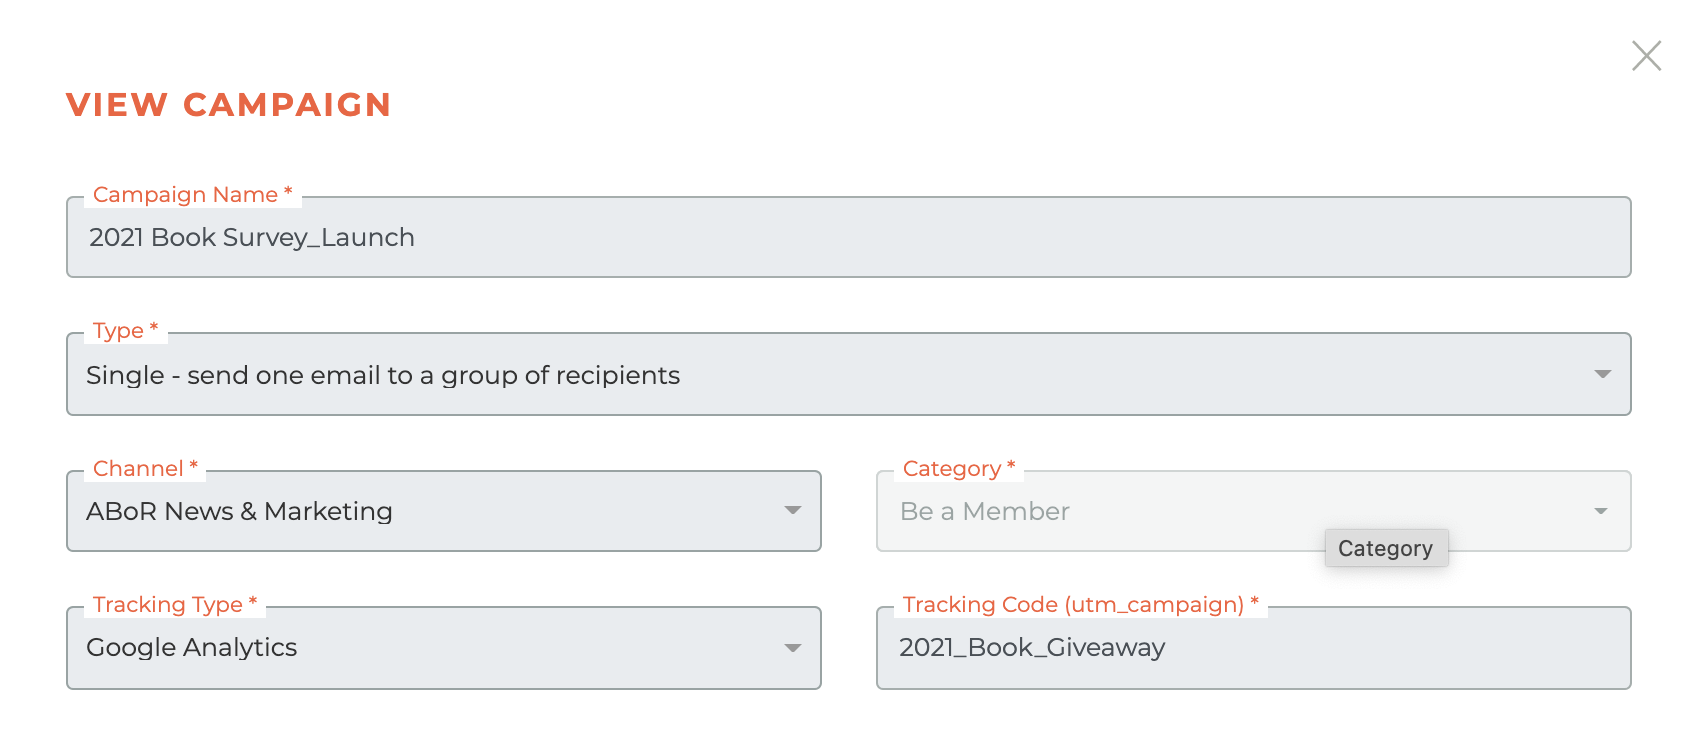
If you would like to add tracking to the campaign and links in the email itself. We provide an automated way of doing this via "Tracking Type." When you select "Google Analytics" you are then prompted to create a campaign tracking code. This is placed in the "Tracking Code (utm_campaign)" field. For a Single email campaign, that is the only field that you should be concerned with. See the example below.
¶ Series & Drip Campaign Tracking
For a series & drip campaigns you will still choose "Tracking Type" and create a campaign code to be used i the "Tracking Code (utm_campaign)" field.
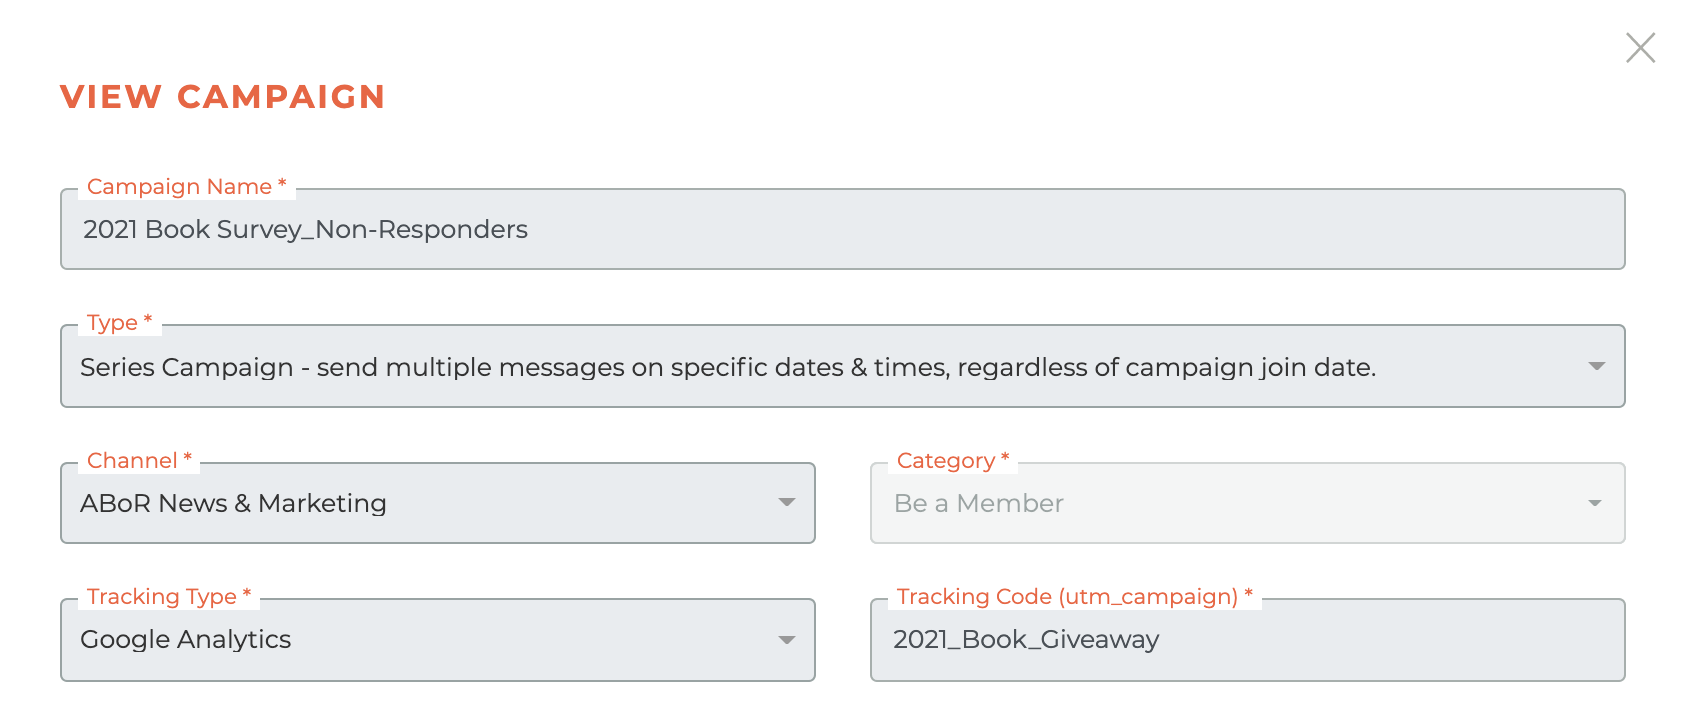
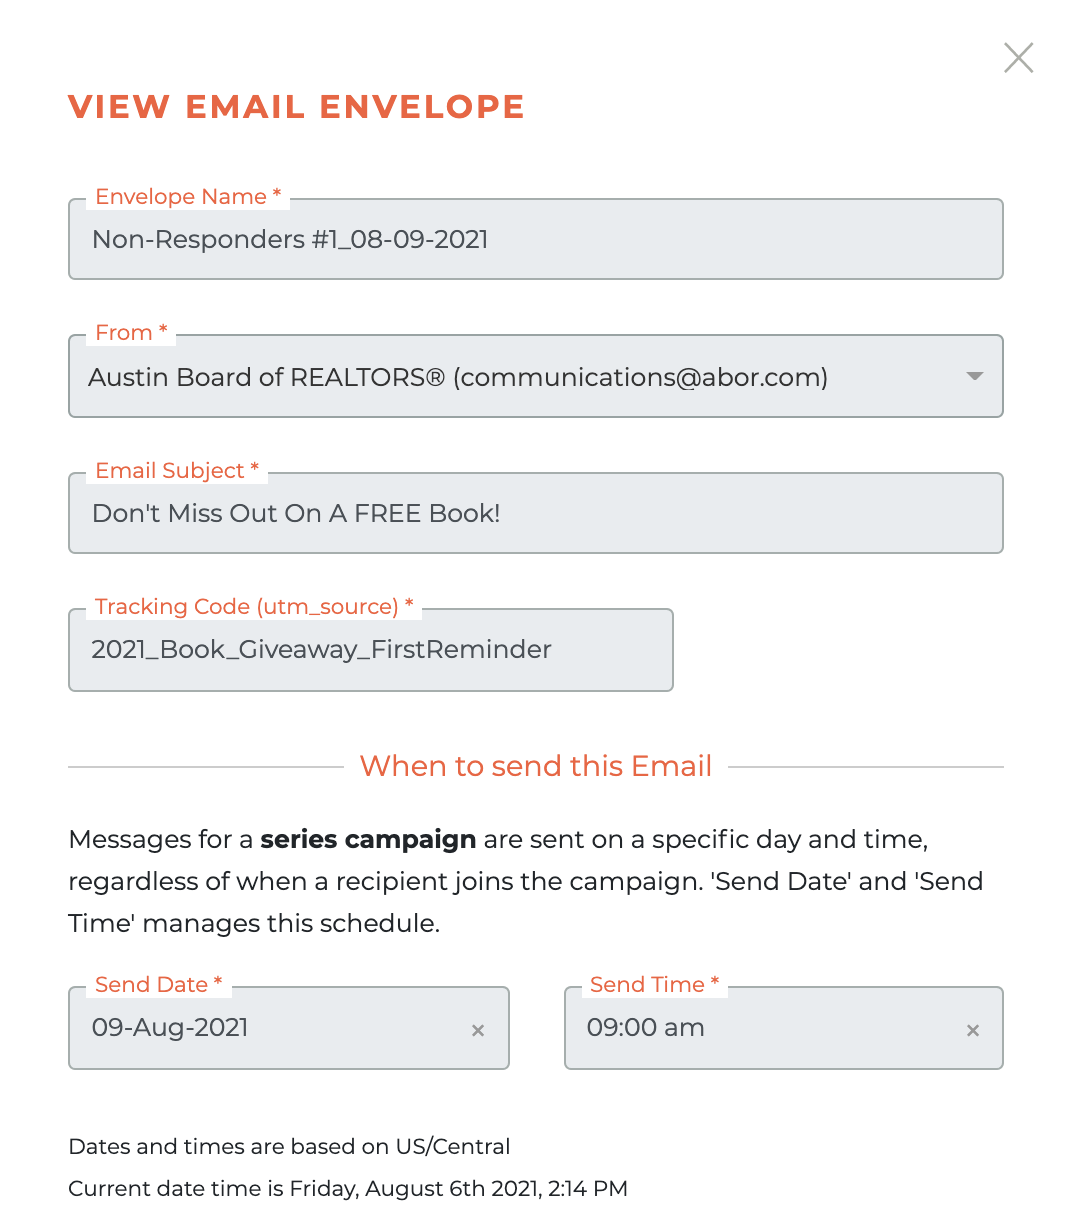
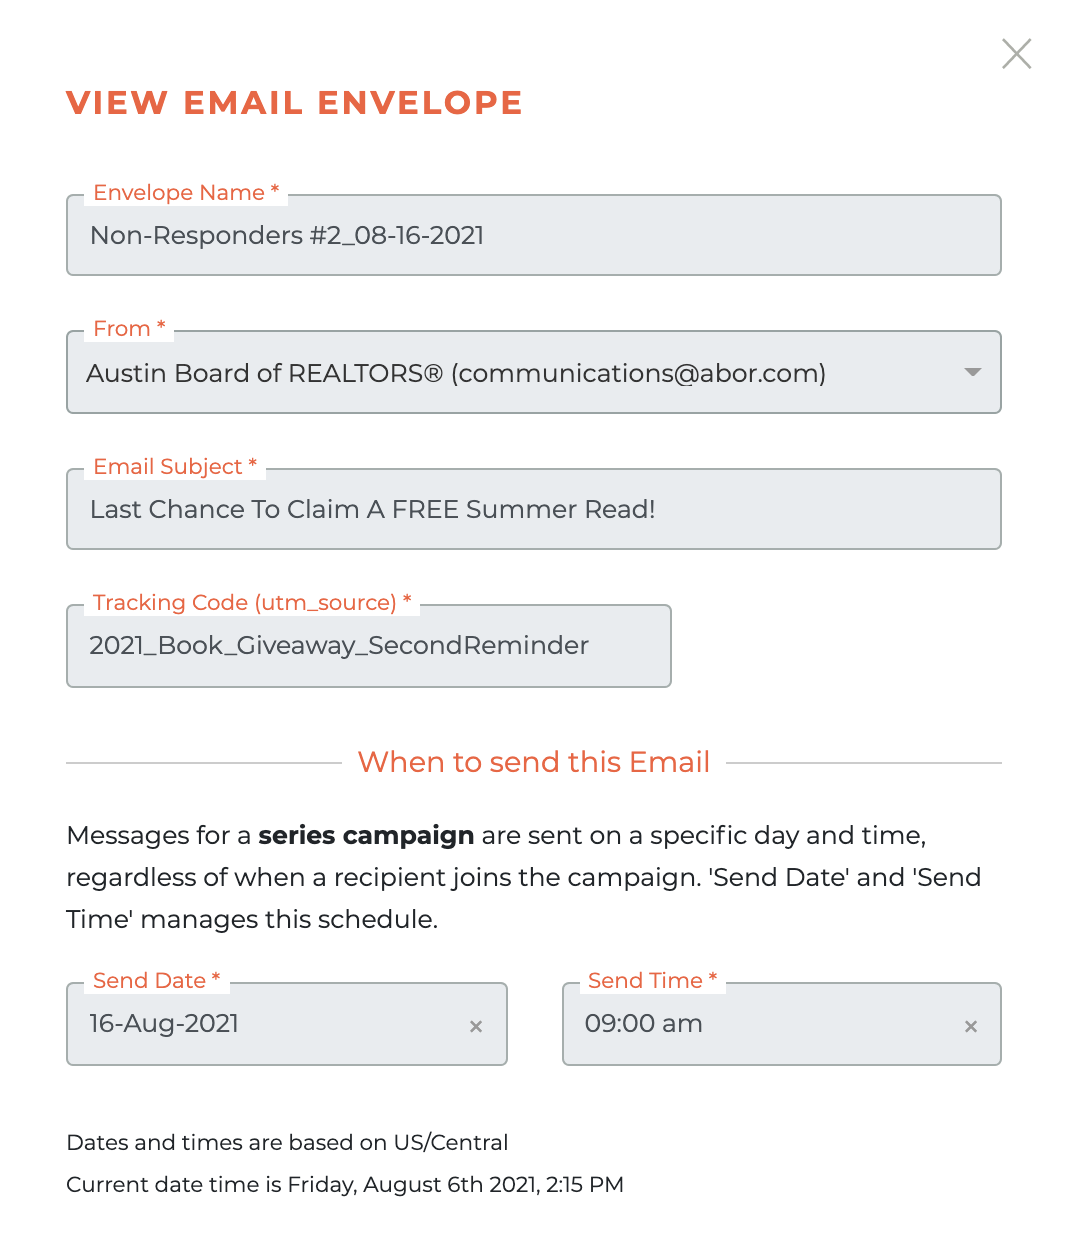
However, since there is often more than one email in a series or drip campaign the additional step of adding a "Tracking Code (utm_source)" is an option. To do this click on the - - Eye icon for the envelope you wish to create the utm_source tracking code for.
This will cause the edit envelope window to slid out from the right side of the dashboard and you will be able to create a unique utm_source for each email in the series. See the examples below.
¶ Campaign Details Appended To Links
Tangilla will attach the following paramaters to each link you put into the email. It will NOT be required to add your own parameters from Google. Your links, however, must include http:// or https://
- utm_source => email.tracking_code
- utm_medium => email
- utm_campaign => campaign.tracking_code
If you manually add these parameters to your links and Google Tracking is enabled, these parameter values will be replaced by those that are specified with the campaign and email.
¶ Launching Campaigns
All campaings launch using the Launch icon made available while in draft or pause status. Drip and Series campaign delivery times are set during envelope creation and single email campaign timing is set at launch. See "Sinlge Email Campaigns Are Different" above.
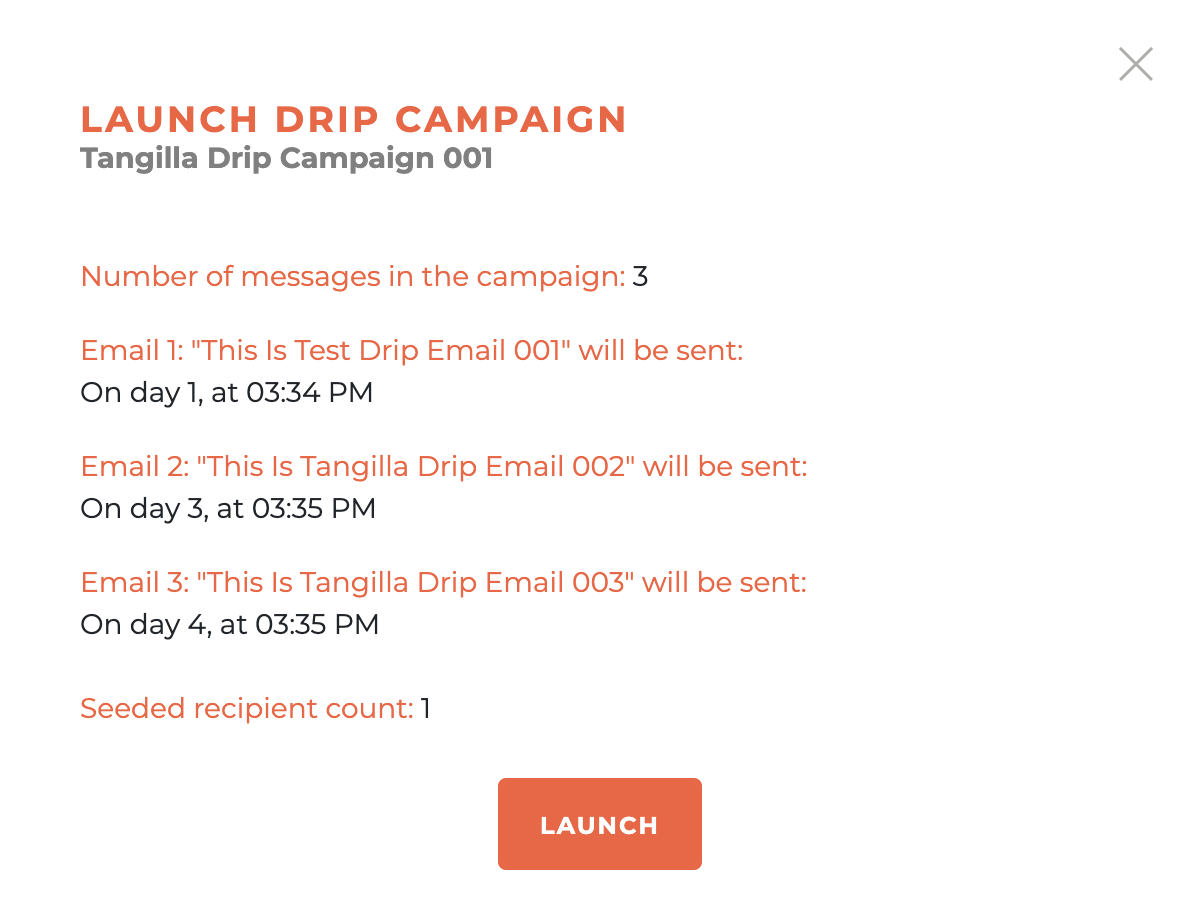
Launching A Drip Campaign
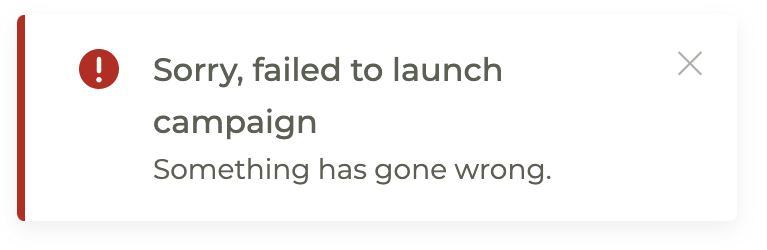
When you go to launch a drip campaign you will see a window like the one below. It will tell you which campaign you're about to launch as well as the description and timing for each email in the drip campaign. If launch is successful, you will receive a success message. If it fails, you will receive a fail message.
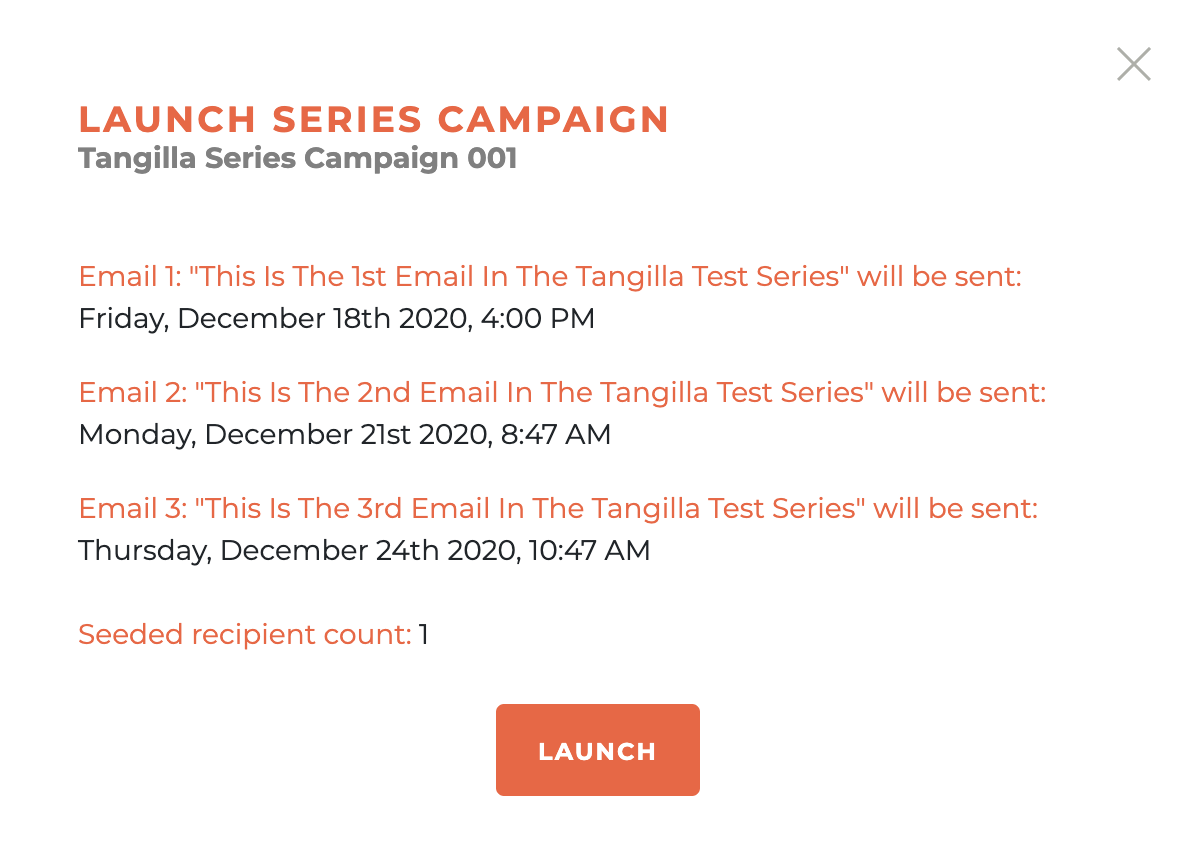
Launching A Series Campaign
When you go to launch a series campaign you will see a window like the one below. It will tell you which campaign you're about to launch as well as the description and timing for each email in the series campaign. If launch is successful, you will receive a success message. If it fails, you will receive a fail message.
An example failure message:
Note: If you have two or more campaigns set to send at the exact same time. They will run in sequence. The second email campaign would not start sending until the first email campaign completes. If you have a preference for which one sends first, please change the send times to reflect that preference.
¶ Email Deliverability & Bounced Emails
Deliverability: Tangilla uses AWS SES for email delivery. Deliverability is monitored constantly. Our historic bounce rate is <1%. Deliverability is only an issue at 4-5%.
Bounced Emails: We have a counter for bounces, and when it exceeds a threshold, we stop sending the user emails. The threshold is 3. Any click or open record resets a person's bounce count.
For complaints, we stop sending emails to the email address immediately.
¶ Frequenstly Asked Questions
| # | Question | Answer |
|---|---|---|
| 1 | What types of campaigns can you create in the Campaigns dashboard? | You can create Single, Drip, and Series campaigns. |
| 2 | How do Drip and Series campaigns interact with segments? | Both recognize when someone enters a segment but do not remove users when they exit a segment. You must create new campaigns to reflect changes in the segment population. |
| 3 | What filters can be applied on the Campaigns dashboard? | You can filter by campaign type, status, channel, and category. |
| 4 | When can campaign details and email envelopes be edited? | Campaign details and envelopes can only be edited in Draft status. |
| 5 | How are Drip campaign send dates determined? | Send dates are relative to when a recipient joins the campaign. Setting “Send Date” to 0 sends the email immediately upon entry. |
| 6 | How does email timing differ for Single campaigns? | For Single campaigns, the send time is set at the time of launch, not in the email envelope. |
| 7 | What happens when you pause a campaign? | Pausing stops future deliveries. You cannot edit the campaign; you must duplicate and relaunch it to make changes. |
| 8 | How do you track links in emails using Google Analytics? | You use the "Tracking Type" field set to Google Analytics and define a campaign tracking code. For Series/Drip campaigns, you can also define unique utm_source codes per email. |
| 9 | What parameters does Tangilla automatically append to email links? | Tangilla appends utm_source, utm_medium, and utm_campaign parameters. If you add your own, they are overridden when Google Tracking is enabled. |
| 10 | What determines whether Tangilla stops sending emails to a user? | If a user has 3 bounces or submits a complaint, Tangilla stops sending them emails. Any open or click resets the bounce counter. |
| 11 | What do the icons in the campaign status columns represent? | Icons represent actions such as edit, copy, view envelope, view report, delete, launch, pause, and change to draft, depending on the campaign's status (Draft, Sent, Active, Paused). |
| 12 | How can you personalize the subject line of an email? | You can include merge tags like {{first_name}} in the subject line to personalize emails for each recipient. |
| 13 | Where are Campaign Channels managed and what are they for? | Channels are managed in the Channels section of the Communication Module and allow members to opt out of specific communications. |
| 14 | How can Campaign Categories be created or selected? | Categories can be created during campaign or envelope creation, or you can select from previously created categories. |
| 15 | What happens when you launch a Drip or Series campaign? | A confirmation window displays the campaign and timing details for each email. A success or failure message will appear after launch. |
| 16 | What is required before launching any campaign? | All email envelopes must be created and configured. Campaigns must be in Draft or Paused status to launch. |
| 17 | How is the sort order adjusted on the Campaigns dashboard? | You can click on column headers to sort; the icon changes to indicate ascending (A–Z, 1–9) or descending (Z–A, 9–1) order. |
| 18 | Can you view campaign reports after sending? | Yes, by clicking the File icon, which opens the report in a right-side panel that can also be printed. |
| 19 | How does the system behave if tracking parameters are added manually to links? | Manually added parameters are overridden by the campaign/email tracking values when Google Tracking is enabled. |
| 20 | What happens if a campaign launch fails? | A failure message is displayed on screen, and the campaign will not be launched. |
| 21 | Can email envelopes be added to any type of campaign? | Yes, email envelopes must be added for every campaign type—Single, Drip, or Series—before launch. |
| 22 | What does the Eye icon do in campaign tracking settings? | It opens the envelope editor to let you assign a unique utm_source tracking code for individual emails in a Drip or Series campaign. |
| 23 | What happens if you use a webhook with a Drip campaign set to day 0? | The email will be sent immediately upon entry to the segment, ignoring the send time, as long as a webhook is used. |
| 24 | What does the History icon do in Paused campaigns? | It allows you to revert a campaign back to Draft status so it can be edited again. |
| 25 | What is required for links in emails to track correctly? | Links must include http:// or https:// for tracking parameters to be appended by Tangilla. |